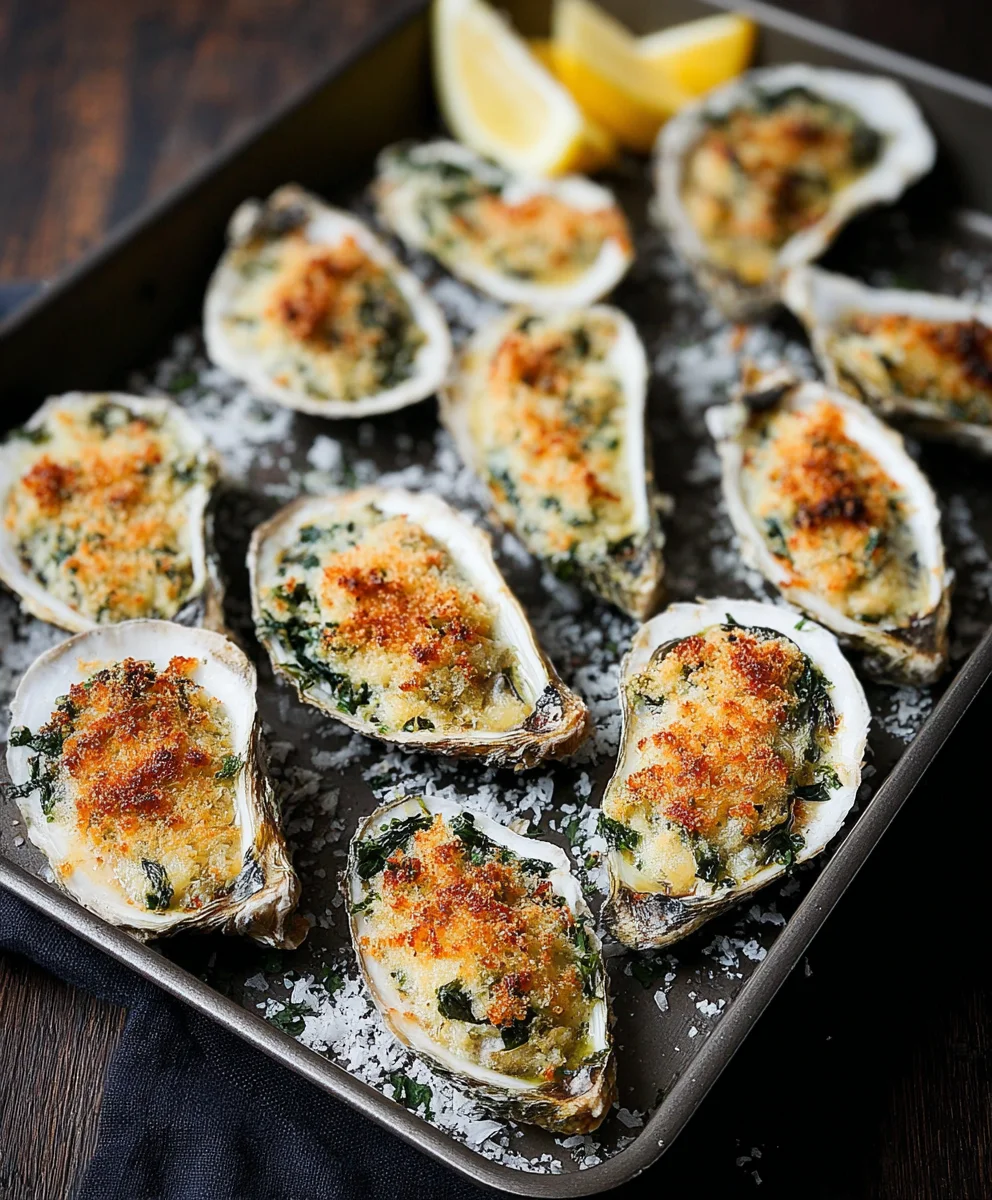
If you’re looking for a dish that brings the taste of the ocean directly to your dining table, look no further than Baked Oysters. This delightful recipe transforms fresh oysters into a gourmet treat, perfect for impressing guests or enjoying a cozy night in. The combination of savory breadcrumbs, rich Parmesan, and a hint of garlic creates a mouthwatering topping that complements the briny flavor of the oysters. Whether you’re hosting a fancy dinner party or simply indulging in a weeknight meal, baked oysters are versatile enough to fit any occasion.
In this article, we’ll explore why you’ll love this recipe, the essential ingredients and utensils you’ll need, detailed step-by-step instructions, tips and variations, and the nutritional benefits of baked oysters. Let’s dive in!
Why You’ll Love This Recipe
There’s something undeniably luxurious about baked oysters. The moment you bite into one, you’re greeted with a burst of flavor from the ocean, enhanced by the rich and crispy topping. Here are a few reasons why this recipe will quickly become a favorite in your home:
- Easy Preparation: Shucking oysters might sound intimidating, but with a little practice, you can master it in no time. Plus, the rest of the recipe is straightforward and quick to prepare.
- Impressive Presentation: Baked oysters look stunning on a platter, making them an excellent choice for entertaining. Your guests will be impressed by the gourmet touch, and you’ll bask in the compliments.
- Flavorful Topping: The crispy breadcrumb mixture, infused with garlic and herbs, adds a delightful crunch and flavor that pairs perfectly with the tender oysters.
- Healthy Option: Oysters are low in calories but rich in protein, omega-3 fatty acids, and key minerals like zinc and vitamin B12, making this dish a nutritious choice.
- Versatile Dish: These baked oysters can serve as an appetizer, a main course, or even a side dish. They work well with various side dishes, from fresh salads to creamy pastas.
Why You Should Try This Recipe
When it comes to seafood, oysters are often regarded as a delicacy. They’re not only delicious but also packed with nutrients. Here’s why making baked oysters at home is a must:
- Freshness Matters: By choosing fresh oysters, you ensure that your dish is bursting with flavor. Enjoying them baked enhances their natural taste and showcases their freshness.
- Control Over Ingredients: Making baked oysters at home allows you to customize the topping to your liking. Want a little more garlic? Or perhaps some spicy heat? You can easily adjust the ingredients to suit your palate.
- Perfect for Any Season: Baked oysters can be enjoyed year-round. They’re perfect for summer gatherings, holiday parties, or even a romantic dinner for two.
- Great for Pairing: Baked oysters pair wonderfully with a variety of drinks. A crisp white wine or a refreshing cocktail can elevate the experience even more.
- Foodie Experience: If you’re a culinary enthusiast, preparing baked oysters is a fun way to explore seafood cooking techniques. It’s a rewarding experience to create something so impressive and delicious.
Ingredients and Utensils Needed
To whip up these delectable Baked Oysters, you’ll need to gather the following ingredients and tools:
Ingredients
- 12 large oysters, shucked
- 1/2 cup breadcrumbs
- 1/4 cup grated Parmesan cheese
- 2 tablespoons unsalted butter, melted
- 2 cloves garlic, minced
- 1 tablespoon fresh parsley, chopped
- 1 tablespoon lemon juice
- Salt and pepper to taste
- Lemon wedges for serving
Utensils
- Oyster Knife: Essential for shucking oysters safely and efficiently.
- Baking Sheet: A sturdy sheet to hold the oysters while they bake.
- Mixing Bowl: To combine the breadcrumb topping ingredients.
- Spoon: For spooning the topping onto the oysters.
- Serving Platter: To present your delicious baked oysters to guests.
- Oven Mitts: For safely removing the hot baking sheet from the oven.
With these ingredients and utensils at your disposal, you’re well on your way to creating a stunning seafood dish that will delight your taste buds.
Detailed Recipe Steps
Now, let’s get into the nitty-gritty of preparing your Baked Oysters. Follow these detailed steps to ensure perfect results:
Step 1: Preheat the Oven
First, preheat your oven to 375°F (190°C). This temperature is ideal for achieving a crispy topping while ensuring the oysters are cooked through.
Step 2: Prepare the Oysters
Carefully shuck the oysters and place them on a baking sheet. If you’re not comfortable shucking, you can ask your fishmonger to do this for you. Be sure to keep the oyster juice in the shell, as it enhances the flavor and keeps them moist during baking. Tip: Use a towel to grip the oyster while shucking for added safety.
Step 3: Make the Topping
In a mixing bowl, combine the breadcrumbs, grated Parmesan cheese, melted butter, minced garlic, chopped parsley, lemon juice, and a pinch of salt and pepper. Mix well until all ingredients are evenly incorporated. This mixture is what makes your baked oysters so delicious!
Step 4: Top the Oysters
Spoon the breadcrumb mixture generously over each oyster, ensuring they are well-covered. The more topping, the better the flavor! Make sure to press down lightly so that it adheres to the oysters.
Step 5: Bake the Oysters
Place the baking sheet in the preheated oven and bake for about 12-15 minutes, or until the topping is golden brown and crispy. Keep an eye on them to prevent burning.
Step 6: Serve
Remove the oysters from the oven and let them cool for a minute. Serve them hot with lemon wedges on the side for squeezing over the top. The acidity from the lemon will brighten the flavors of the dish beautifully.
Enjoy your delicious baked oysters as a delightful appetizer or a main dish!
Tips and Variations
While this recipe is fantastic as is, here are some tips and variations to enhance your baked oysters experience:
Alternative Ingredients
- Vegan Version: Use vegan butter and replace the Parmesan cheese with nutritional yeast or a vegan cheese alternative for a plant-based option.
- Gluten-Free Option: Substitute regular breadcrumbs with gluten-free breadcrumbs or crushed gluten-free crackers.
- Spicy Kick: Add red pepper flakes or diced jalapeños to the breadcrumb mixture for a spicy version.
- Herb Variations: Experiment with different herbs like thyme, basil, or dill to find your favorite flavor combination.
Avoiding Common Mistakes
- Overcooking the Oysters: Keep a close eye on them while baking. Overcooked oysters can become rubbery.
- Skipping the Shucking: Always ensure the oysters are properly shucked before baking to allow the topping to adhere.
- Not Seasoning Enough: Don’t skimp on the salt and pepper in the topping. Proper seasoning is key to enhancing the flavors.
Nutritional Values and Benefits
Understanding the nutritional benefits of your food can enhance your cooking experience. Here’s a breakdown of the nutritional values of baked oysters (per serving, based on 2 oysters):
- Calories: 150
- Total Fat: 7g
- Saturated Fat: 4g
- Cholesterol: 30mg
- Sodium: 180mg
- Total Carbohydrates: 15g
- Dietary Fiber: 1g
- Sugars: 0g
- Protein: 6g
Oysters are a powerhouse of nutrients. They are loaded with:
- Protein: Essential for muscle repair and growth.
- Omega-3 Fatty Acids: Beneficial for heart health and reducing inflammation.
- Zinc: Important for immune function and skin health.
- Vitamin B12: Vital for nerve function and the production of DNA.
Frequently Asked Questions
What is the best way to shuck oysters?
The best way to shuck oysters is to use an oyster knife and a towel. Hold the oyster with the flat side up and insert the knife into the hinge. Twist the knife to pop it open, and then slide the knife along the shell to cut the muscle.
Can I use frozen oysters for this recipe?
Yes, you can use frozen oysters, but it’s best to thaw them completely before baking. Ensure they are well-drained to avoid excess moisture.
How do I know when baked oysters are done?
Baked oysters are done when the topping is golden brown and crispy, usually after 12-15 minutes in the oven. The oysters should be hot but not overcooked.
What should I serve with baked oysters?
Baked oysters pair well with a refreshing salad, crusty bread, or even a light pasta dish. They also make a delightful starter before a seafood feast.
Conclusion
In summary, Baked Oysters are a delicious and impressive dish that can elevate any meal. With a simple yet flavorful topping, they showcase the natural taste of oysters while adding a delightful crunch. Don’t hesitate to experiment with different ingredients and variations to make this recipe truly your own. We invite you to try this recipe, comment below with your thoughts, share it with friends, and enjoy the wonderful world of baked oysters!
For more delicious recipes, check out our other amazing dishes such as Lentil Soup, Pumpkin Soup, and Pizza Dough Recipe.
Happy cooking!
For more culinary inspiration, don’t forget to visit our Pinterest page: Recipes Luna Blog on Pinterest.
Baked Oysters
Ingredients
Equipment
Method
- Preheat your oven to 375°F (190°C).
- Carefully shuck the oysters and place them on a baking sheet. If you're not comfortable shucking, you can ask your fishmonger to do this for you.
- In a mixing bowl, combine the breadcrumbs, grated Parmesan cheese, melted butter, minced garlic, chopped parsley, lemon juice, and a pinch of salt and pepper. Mix well until all ingredients are evenly incorporated.
- Spoon the breadcrumb mixture generously over each oyster, ensuring they are well-covered.
- Place the baking sheet in the preheated oven and bake for about 12-15 minutes, or until the topping is golden brown and crispy.
- Remove the oysters from the oven and let them cool for a minute. Serve hot with lemon wedges on the side for squeezing over the top.