Welcome to the world of shockingly simple, melt-in-your-mouth homemade confections! If you’ve been searching for a quick dessert that requires zero baking, minimal ingredients, and maximum nostalgic flavor, look no further than classic Cool Whip Candy. Often referred to as “Poor Man’s Fudge” or “Snowball Fudge,” this delightful treat is built on just three essential ingredients, yielding a soft, intensely sweet, and beautifully coated candy that is perfect for holiday platters, gifting, or satisfying a serious sugar craving.
Our “Perfection Version” of this iconic sweet ensures you bypass the common pitfalls no more sticky, impossible-to-handle mixtures! We focus on precise measurements, the crucial role of chilling, and the perfect balance of texture, guaranteeing that your homemade Cool Whip Candy comes out firm, smooth, and ready to impress. Get ready to transform a tub of whipped topping and a bag of powdered sugar into magic. This is not just a recipe; it’s a foundational technique for creating super easy homemade candy, a testament to the fact that the best desserts are often the simplest ones.
Why You’ll Fall Head Over Heels for This Cool Whip Candy Recipe
In the crowded landscape of elaborate desserts and multi-step baking projects, Cool Whip Candy stands out as a genuine culinary breath of fresh air. It’s a testament to the power of simplicity, offering a profound sense of satisfaction with minimal effort. But what exactly makes this three-ingredient wonder so universally adored?
Effortless Elegance: The Magic of Minimal Ingredients (The Two-Ingredient Wonder)
The primary appeal of this candy is its sheer simplicity. You require only two main components: frozen whipped topping (Cool Whip) and confectioners’ sugar. When these two ingredients combine, they undergo an almost magical transformation. The sugar absorbs the moisture and fats from the whipped topping, stabilizing the mixture into a dense, fudge-like consistency that is firm enough to cut, yet soft enough to melt instantly on the tongue. This recipe is your secret weapon for those moments when you need a spectacular dessert but have absolutely no time for complex techniques or lengthy ingredient lists.
The No-Bake Advantage: Save Time and Effort
Forget turning on the oven, worrying about precise baking times, or dealing with stovetop thermometers typically required for traditional fudge. Cool Whip Candy is a completely no-bake process. Your main energy expenditure comes from mixing the ingredients and your main waiting time involves letting the refrigerator do its essential work. This makes it an ideal activity for hot summer days, busy holiday seasons, or when engaging younger children in the kitchen. The only heat involved is the warmth of anticipation!
A Texture That Defies Description
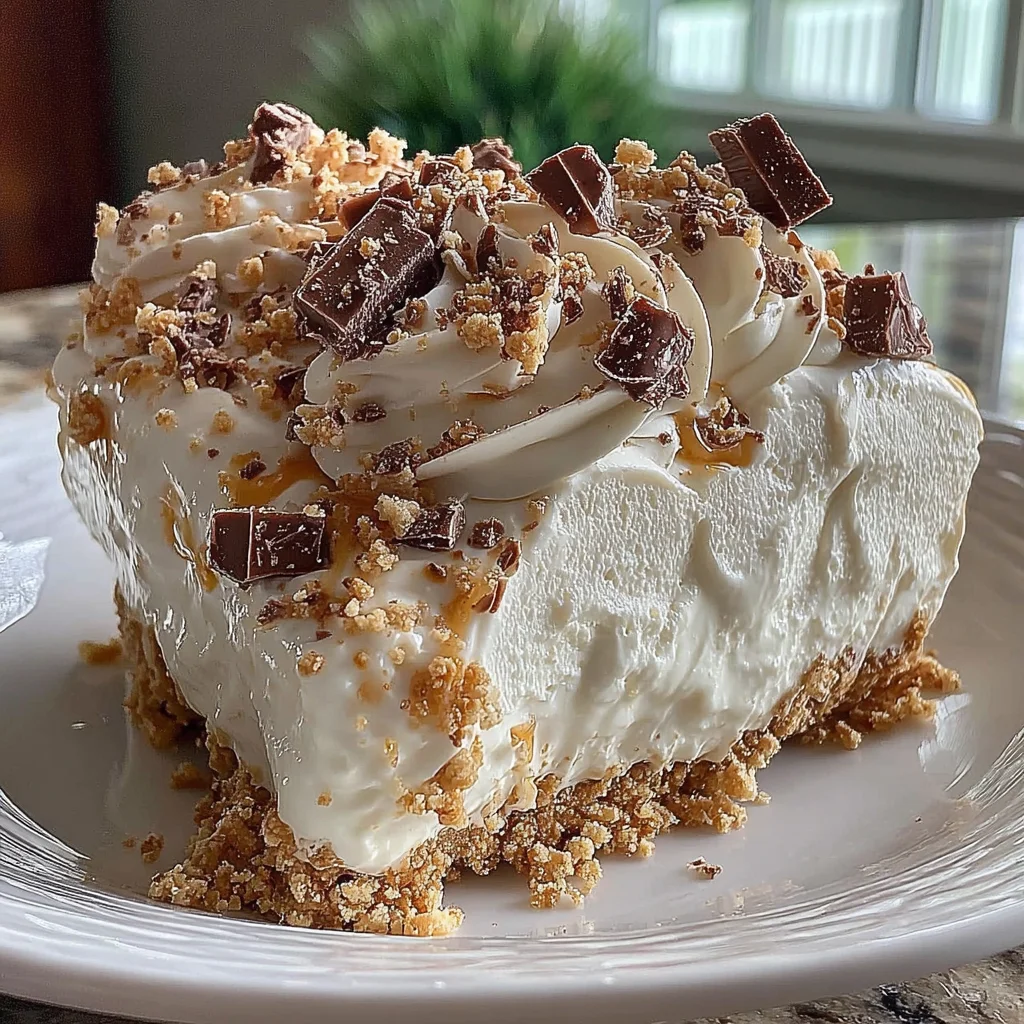
While often compared to fudge, the texture of properly made Cool Whip Candy is unique. It’s significantly lighter and airier than traditional sugar fudge, thanks to the incorporation of the whipped topping. The result is a pillowy, soft bite that holds its shape beautifully once chilled, but dissolves into a sweet, creamy cloud the moment it hits your palate. The coating of extra powdered sugar only enhances this sensation, adding a delicate, slightly crunchy shell to the smooth interior.
Versatility and Customization: Endless Flavor Possibilities
The neutral, sweet base flavor provided by the Cool Whip Candy mixture serves as a perfect canvas for endless customization. You can easily adapt this recipe to suit any season or preference. Whether you decide to incorporate a splash of almond extract, a dusting of cocoa powder, or roll the finished squares in crushed peppermint or festive sprinkles, the ability to personalize this treat means you can make a fresh batch for every event.
Budget-Friendly and Accessible
For those watching their budget, this recipe is incredibly economical. Both frozen whipped topping and confectioners’ sugar are widely available and inexpensive staples. This high-yield recipe delivers a large quantity of delightful candy using minimal investment, making it a fantastic option for parties, school events, or large family gatherings where you need to feed a crowd without breaking the bank. It truly is one of the most cost-effective yet delicious homemade candies you can create.
Why You Should Try This Cool Whip Candy Recipe Now
The promise of quick, simple treats is always tempting, but the true genius of Cool Whip Candy lies in its reliability and payoff. If you’ve ever hesitated to make homemade candy because of past struggles with crystallization or temperamental sugar stages, this recipe is your guaranteed victory. This is the definition of a low-stress, high-reward dessert.
A Guaranteed Win for Beginning Candy Makers
Traditional candy making often involves high heat, precise timing, and tricky techniques like managing boiling sugar syrup. Skip all that complexity! Our Cool Whip Candy recipe removes all barriers to entry. If you can measure and stir, you can successfully make this candy. This accessibility makes it a wonderful starting point for novice cooks who want to venture into the world of confectionery without the risk of failure.
Perfect for Holiday and Party Platters
During the busy holiday season, time is precious. This candy can be prepared several days in advance, allowing you to check one item off your entertaining list early. Its bright, snowy appearance, especially when coated generously with powdered sugar, makes it instantly festive and appealing on any cookie or candy platter. Furthermore, unlike chocolates or caramel candies that require specific storage temperatures, the simple refrigeration requirement of Cool Whip Candy ensures it stays perfectly shaped and fresh.
The Satisfaction of DIY Confections
There is a unique pride that comes with serving homemade treats. When you present a plate of beautifully cut and coated Cool Whip Candy, few people will believe it took you less than 15 minutes of active preparation time. The dense, pliable texture feels professional, giving you the rewarding experience of having created a gourmet-quality dessert from basic pantry ingredients. It’s an exercise in culinary minimalism that delivers maximum flavor impact.
The Secret to Texture Mastery: Hitting the Clay Consistency
Many recipes that rely on high amounts of powdered sugar (like cream cheese mints) hinge on achieving the perfect, non-sticky texture. Our “Perfection Version” meticulously guides you through the process of integrating the powdered sugar until the mixture transforms from a sticky mess into a firm, manageable “candy clay.” This crucial step ensures that when you press it into the pan, it sets rock-solid in the refrigerator, ready for clean, sharp cuts a hallmark of professional-looking Cool Whip Candy.
Ingredients and Necessary Utensils for Cool Whip Candy Success
While the ingredient list for this candy is short, focusing on quality and proper preparation of these items is paramount to achieving the perfect, non-sticky consistency. Do not attempt substitutes without reading the variations section, as the fat and stabilizer content in the frozen whipped topping is essential to this specific recipe.
The Essential Ingredients
Here is a detailed breakdown of the components required to make the ultimate batch of Cool Whip Candy:
- 1 Large Container (8 ounces / 226g) Frozen Whipped Topping (such as Cool Whip):
- Preparation is Key: This must be thawed completely in the refrigerator. Do not rush this process by microwaving or leaving it on the counter, as rapid thawing can cause separation, compromising the final texture. The topping needs to be soft, creamy, and homogenous meaning no icy bits and no watery layer at the bottom. The fat stabilizers in the whipped topping are what bond with the sugar to create the “fudge.”
- 4 Cups Confectioners’ Sugar (also known as Powdered Sugar or Icing Sugar):
- The Structural Backbone: This is the most important component for structure. Four cups is typically the perfect amount needed to absorb all the moisture and create the required firm consistency.
- Plus Extra for Coating: You will need an additional 1/2 to 1 cup for rolling the finished candy. Do not skip the coating, as it prevents sticking and adds that classic “snowball” look.
- Sifting: While optional, sifting the confectioners’ sugar is highly recommended. Powdered sugar often clumps dramatically during storage. Sifting removes these lumps, ensuring a smoother initial mix and preventing tiny pockets of dry sugar in your finished candy.
- 1 Teaspoon Pure Vanilla Extract:
- Flavor Enhancer: Vanilla is essential for rounding out the flavor, preventing the candy from tasting overwhelmingly like just sugar. Use high-quality pure vanilla extract for the best flavor profile.
- Pinch of Salt (Optional but Recommended):
- Balance the Sweetness: A tiny pinch of fine table salt (about 1/4 teaspoon) might seem unnecessary in a dessert, but it is critical in intensely sweet recipes like Cool Whip Candy. The salt cuts through the cloying sweetness of the sugar, enhancing the vanilla and giving the candy a more complex, satisfying taste.
- Optional Flavor & Coating Additions:
- 1/2 cup Finely Crushed Graham Crackers: Provides a pleasant texture contrast when rolled into the candy.
- Sprinkles/Sanding Sugar: Excellent for a colorful, festive finish.
- Cocoa Powder: Replace 1/4 cup of confectioners’ sugar with high-quality unsweetened cocoa powder for a chocolatey version.
Essential Tools for Cool Whip Candy Perfection
While this recipe is simple, using the correct tools ensures easier mixing, handling, and chilling. Precision here reduces stress later.
- Large Mixing Bowl: You will need plenty of room for mixing. When the powdered sugar is incorporated, the volume increases, and the mixture becomes very stiff, so a large, sturdy bowl is a must.
- Sturdy Mixing Utensil (Wooden Spoon or Silicone Spatula): Do not rely on a flimsy plastic spatula. As the sugar is added, the mixture becomes incredibly thick and dense, similar to clay or very stiff dough. A robust wooden spoon or a high-quality, stiff silicone spatula is necessary for incorporating the final cup of sugar.
- 8×8 Inch Baking Pan: This size is ideal for the volume of the recipe, ensuring the candy sets thick enough (about 1.5 inches deep) for satisfying bite-sized pieces. If you use a 9×13 inch pan, your candy will be much thinner and harder to cut cleanly.
- Parchment Paper: This is Non-Negotiable. Lining the pan with parchment paper is essential. Create a “sling” by leaving overhang on two sides. This allows you to lift the set, firm candy block out of the pan without damaging the edges or requiring tedious scraping.
- Fine Mesh Sifter (Recommended): For ensuring the smoothest incorporation of the confectioners’ sugar, as noted above.
- Sharp Knife and Cutting Board: For clean cuts after chilling. A large, non-serrated chef’s knife works best.
- Measuring Cups and Spoons: While many recipes allow for estimation, the ratio of Cool Whip to powdered sugar is crucial for the structural integrity of this candy. Precise measuring of the 4 cups of sugar is key to hitting that non-sticky, clay-like consistency.
By preparing these few, basic ingredients and tools, you are setting yourself up for guaranteed success with your no-bake Cool Whip Candy.
Detailed Recipe Steps: Mastering the Art of Cool Whip Candy
Follow these steps closely, paying special attention to the texture changes in Step 2. This is where success is determined.
Step 1: Preparation and Thawing the Base
- Thaw Completely: Ensure your large container of frozen whipped topping is completely thawed. This process should ideally take place overnight in the refrigerator. The topping should be uniformly soft, like a thick pudding, with no liquid separation. If the Cool Whip is still partially frozen, it will not combine correctly with the sugar.
- Prep the Pan: Line an 8×8 inch baking pan with parchment paper. Ensure the paper covers the bottom and extends over the sides, creating a sling. This simple preparation step is the most critical trick for easy removal of your finished Cool Whip Candy block. Lightly misting the parchment with non-stick spray is optional but adds insurance.
- Measure the Sugar: Measure 4 cups of confectioners’ sugar and, if time allows, sift it into a separate bowl. Have the extra coating sugar (about 1/2 cup) ready on a plate for the final stage.
Step 2: Combining the Candy Base (Achieving the Right Consistency)
- Initial Wet Mix: In a large mixing bowl, gently scoop in the thawed whipped topping. Add the 1 teaspoon of vanilla extract and the pinch of salt. Mix these ingredients slowly using a spatula until they are just combined. Avoid aggressive mixing, as incorporating too much air can deflate the topping and make the final candy less firm.
- Incorporating the Sugar (The Transformation): Begin adding the measured 4 cups of confectioners’ sugar, one cup at a time.
- Cups 1 & 2: The mixture will initially be very wet, sticky, and loose, resembling a thick, gooey frosting. Use your spatula or wooden spoon to incorporate the sugar until no white streaks remain.
- Cups 3 & 4: As you add the third and fourth cups, the mixture will thicken dramatically. It will become increasingly difficult to stir. You are aiming for a consistency that resembles stiff play dough or thick clay. It should pull away from the sides of the bowl. You may need to transition from stirring to a gentle kneading motion with your spatula or even your (clean and dusted) hands to ensure all the sugar is absorbed.
- Stopping Point: Stop adding sugar once the mixture is firm enough that you can press it with your finger without it leaving a sticky residue. It should be pliable but not wet.
Step 3: Chilling and Setting the Cool Whip Candy
- Press into the Pan: Transfer the thick candy mixture into the prepared 8×8 inch pan. Use the back of a spoon, or a spatula lightly dusted with powdered sugar, to press the mixture firmly and evenly into the pan. Ensure the surface is as flat and uniform as possible. Firm pressure helps eliminate air pockets and creates a dense, solid block for cutting.
- Tight Cover: Cover the pan tightly with plastic wrap. Press the plastic wrap down so it touches the surface of the candy block (this prevents condensation from forming and softening the surface).
- Chill Time: Place the pan into the refrigerator and chill for a minimum of 4 hours. For optimal structure and the cleanest cuts, chilling overnight (10 to 12 hours) is highly recommended. Do not attempt to cut the candy before it is fully firm.
Step 4: Cutting and Shaping the Confections
- Remove the Block: Once the mixture is completely solid, use the parchment paper sling to lift the entire block of candy out of the pan. Place it onto a clean cutting board.
- Clean Cuts: Using a sharp knife, slice the block into small, bite-sized squares or rectangles. A standard size of 1 inch by 1 inch works best for a neat presentation. Tip: Wipe your knife clean with a damp cloth between cuts to prevent dragging or sticking.
- Rolling Option: If you prefer the traditional “snowball” look, use a miniature cookie scoop or a measuring spoon to portion out small amounts. Lightly dust your palms with confectioners’ sugar and gently roll the portions into smooth, uniform balls.
Step 5: Coating and Finishing
- Prep the Coatings: Place the reserved extra confectioners’ sugar onto a shallow plate. If using optional coatings (like crushed graham crackers or sprinkles), place them in separate shallow bowls.
- Coat Thoroughly: Take each cut square or rolled ball and gently toss it in the confectioners’ sugar until all sides are evenly and generously coated. The sugar prevents the candy pieces from sticking together and gives the candy its signature look. Tap off any heavy excess.
- Apply Variations: If using alternative coatings, roll the pieces immediately in the crushed ingredients. The slight stickiness remaining on the candy surface will help the coating adhere.
- Final Placement: Place the finished Cool Whip Candy pieces onto a clean plate or baking sheet lined with wax paper, ensuring they are not touching.
Step 6: Storage and Shelf Life
Important: Cool Whip Candy must be stored in the refrigerator due to the nature of the whipped topping base.
- Store the finished candies in an airtight container in the refrigerator. Layer the candies separated by sheets of wax or parchment paper.
- The candy will maintain its best texture and flavor for up to 10 days when properly chilled.
- For longer storage, the candies freeze beautifully. Place them in a single layer in a freezer-safe bag or container and freeze for up to 2 months. Thaw briefly in the refrigerator before serving.
Cool Whip Candy Tips, Tricks, and Delicious Variations
Once you’ve mastered the basic technique, you can easily tweak this recipe to create endless flavor combinations. Here are tips to troubleshoot common issues and ideas for exciting new versions.
Troubleshooting Common Mistakes
The most frequent issue with Cool Whip Candy is a sticky or overly soft final product. Here’s how to fix or avoid these problems:
- Problem: The Mixture is Too Sticky to Handle: This means you haven’t added enough confectioners’ sugar. Keep mixing! The final dough must be very, very stiff. If you stopped stirring because your arm hurt, you likely need another 1/4 to 1/2 cup of sugar. The final result should feel like slightly sticky clay, not wet icing.
- Problem: The Candy Crumbles When Cut: This usually means the candy was not chilled long enough. The stabilizers in the Cool Whip need time to fully solidify with the sugar. If it crumbles, return it to the fridge for several more hours or, ideally, overnight.
- Tip for Humidity: On very humid days, powdered sugar tends to absorb moisture from the air quickly. You may need to add slightly more than 4 cups of sugar to compensate and reach the desired firm consistency.
- Cleaning the Knife: For perfectly clean slices, keep a bowl of hot water and a towel nearby. Dip the knife in the hot water, wipe it dry, cut one row, and repeat. The warmth helps the knife slice cleanly through the dense candy.
Flavor and Ingredient Variations
The beauty of the Cool Whip Candy base is its versatility. Experiment with these additions:
- Mint Chocolate Cool Whip Candy: Replace the vanilla extract with 1 teaspoon of pure peppermint extract. Optionally, fold in 1/4 cup of mini chocolate chips before chilling.
- Citrus Zest: Add the zest of one lemon, lime, or orange to the initial wet mixture. This provides a beautiful, bright counterbalance to the sweetness.
- Nutty Crunch: Instead of rolling the finished candies in powdered sugar, roll them in finely chopped toasted pecans, walnuts, or almonds. This provides a delightful textural complexity.
- Cinnamon Swirl: Mix 1 teaspoon of ground cinnamon into the confectioners’ sugar before adding it to the Cool Whip. This gives the candy a lovely, warm undertone, similar to sugar cookie fudge.
- Dairy-Free/Vegan Option: While the classic version relies on traditional Cool Whip, certain brands now offer dairy-free or coconut-based whipped toppings (often found in the freezer section alongside Cool Whip). Ensure the substitute ingredient is the frozen, high-fat variety, not the light or aerosol version, as the density is crucial for absorbing the sugar.
Presentation Ideas
Since this candy is so easy to make, focus on elevated presentation:
- Dipping: Instead of rolling the entire piece in sugar, melt white or dark chocolate coating wafers. Dip the bottom of the square in chocolate and place on wax paper to set. This adds visual contrast and richness.
- Layering: Use cocoa powder (or melted chocolate) in half the mixture to create two separate colors. Layer the white and brown mixtures in the pan before chilling, then cut into two-tone squares for a mocha effect.
- Using Molds: Instead of pressing the mixture into a square pan, press small amounts of the dough into flexible silicone mini-muffin or holiday-themed candy molds. Once chilled, they pop right out, offering fun shapes without extra effort.
Nutritional Insights and Considerations for Cool Whip Candy
As a no-bake confection, Cool Whip Candy is, fundamentally, a dense block of sweetness designed for indulgence. Understanding its core components helps manage serving sizes and fit this treat into a balanced diet.
Understanding the Calorie Density
The primary ingredients are refined sugar (confectioners’ sugar) and a highly stabilized mixture of water, corn syrup, high fructose corn syrup, and fats (frozen whipped topping). This combination results in a high-calorie and carbohydrate-dense dessert.
For estimation purposes (using standard Cool Whip and assuming 36 small 1×1 inch servings):
| Nutritional Component (Estimated Per 1-inch Square) | Value |
|---|---|
| Calories | 80 – 100 kcal |
| Total Fat | 1 – 2g |
| Saturated Fat | 1 – 1.5g |
| Sodium | Negligible |
| Total Carbohydrates | 18 – 22g |
| Sugar | 17 – 21g |
| Protein | Less than 0.5g |
Note on Calculation: These values are estimates, as commercial whipped toppings vary. The density comes almost entirely from the granulated sugar in the whipped topping and the added confectioners’ sugar.
The Role of Confectioners’ Sugar in Candy Making
Confectioners’ sugar serves two major roles here: it is the primary sweetener, and more importantly, it is the structural ingredient. Unlike granulated sugar, powdered sugar contains a small amount of cornstarch (typically 3-5%). This cornstarch prevents clumping and aids in absorbing the liquid from the Cool Whip, which is essential for transforming the sticky mixture into the rigid “candy clay” needed for setting. Without this high concentration of powdered sugar, the candy would remain an unstable, soft paste.
Best Practices for Enjoying Cool Whip Candy
Because this confection is highly calorie-dense, it is best enjoyed in moderation. The bite-sized format of Cool Whip Candy is perfect for savoring a small amount without overindulging. When serving:
- Portion Control: Stick to the small 1-inch squares. These are intentionally rich and satisfying in small doses.
- Timing: Pair this dessert with a lower-sugar meal or enjoy it as a small, decadent treat after dinner.
- Hydration: Given the high sugar content, always enjoy this sweet treat with a glass of water or unsweetened tea.
Ultimately, Cool Whip Candy is a joyous, simple indulgence. By being aware of its nutritional profile, you can easily enjoy this classic confection as part of a balanced diet, especially during celebrations and special occasions.
FAQs About Cool Whip Candy (Perfection Version)
Frequently Asked Questions (FAQs)
How long does Cool Whip Candy need to chill to set properly?
The candy requires a minimum of 4 hours in the refrigerator, but for the best, most stable results and the cleanest possible cuts, chilling overnight (10 to 12 hours) is highly recommended. If the candy feels soft or sticky when you press it, it needs more time.
Can I use homemade whipped cream instead of Cool Whip?
No, homemade whipped cream is too unstable and lacks the necessary stabilizers and emulsifiers found in frozen whipped topping (like Cool Whip). Using real cream will result in a messy, wet mixture that will not absorb the powdered sugar correctly or set into the required firm, sliceable candy texture.
Why is my Cool Whip Candy too soft or sticky after I followed the recipe?
Stickiness is almost always caused by insufficient powdered sugar. The mixture must transform into a very stiff, almost clay-like dough before chilling. If it remains sticky, mix in an additional 1/4 cup of sifted confectioners’ sugar until the dough is manageable. Also, ensure the whipped topping was fully thawed and not separated.
How should I store this easy homemade candy?
Due to the base ingredient, Cool Whip Candy must be stored in an airtight container in the refrigerator to maintain its shape and texture. Layer the pieces with parchment paper to prevent them from sticking together. When stored correctly, the candy stays fresh for up to 10 days.
Can I freeze Cool Whip Candy?
Yes, Cool Whip Candy freezes very well. Once the pieces are coated, arrange them in a single layer on a sheet pan, freeze until solid, and then transfer them to a freezer-safe bag or container. They can be frozen for up to two months. Thaw them briefly in the refrigerator before serving.
Conclusion: The Sweet Simplicity of Cool Whip Candy
The journey to crafting the perfect batch of Cool Whip Candy proves that sometimes, the simplest recipes yield the most delightful results. This “Perfection Version” offers an incredibly low-effort, high-reward dessert that consistently delivers a unique, airy, and intensely sweet confection.
We’ve covered the essential techniques: the non-negotiable step of overnight thawing, the careful incorporation of the 4 cups of confectioners’ sugar until a stiff, non-sticky clay is formed, and the crucial requirement of an extended, deep chill. Mastering these few simple steps ensures your candy is firm, sliceable, and ready to be coated in its iconic snowy shell.
Whether you’re looking for a quick, nostalgic treat, a budget-friendly option for mass production, or an easy alternative to traditional baking, Cool Whip Candy checks every box. It’s a wonderful centerpiece on a holiday dessert tray or a delightful snack alongside a cup of coffee. Don’t forget that this easy process can also be applied to other fast sweets, like making whipped shortbread cookies or a creamy fudge.
We invite you to try this recipe today and experience the magic of this three-ingredient classic. Share your results, flavor variations, and favorite coatings in the comments below we love hearing how you make this simple recipe your own!
COOL WHIP CANDY (PERFECTION VERSION)
Ingredients
Equipment
Method
- Ensure the whipped topping (Cool Whip) has been completely thawed. This process should ideally be done overnight in the refrigerator until the topping is soft and homogenous.
- Line an 8x8 inch baking pan with parchment paper, ensuring the paper hangs over the sides to create a removal 'sling.' Lightly grease the parchment paper with non-stick cooking spray if desired.
- In a large mixing bowl, gently combine the thawed whipped topping, vanilla extract, and the small pinch of salt. Mix slowly using a spatula or hand mixer on low speed until just combined. Avoid overmixing.
- Begin adding the 4 cups of confectioners' sugar, one cup at a time. Use a sturdy spoon or spatula to incorporate the sugar thoroughly. Continue mixing until the consistency resembles extremely stiff cookie dough or thick clay. You must reach this level of firmness for the candy to set properly.
- Transfer the thickened candy mixture into the prepared 8x8 inch pan. Use the back of a spoon or a slightly dampened spatula to press the mixture firmly and evenly into the pan, ensuring the surface is flat and uniform.
- Cover the pan tightly and place it into the refrigerator. Chill for a minimum of 4 hours. For the best results and easiest cutting, chill the mixture overnight (10 to 12 hours).
- Once completely firm, lift the candy block out of the pan using the parchment paper sling and place it onto a clean cutting board. Cut the block into small, bite-sized squares (1 inch by 1 inch is standard).
- Pour the extra confectioners' sugar onto a shallow plate. Take each cut square or rolled ball and gently toss it in the sugar until all sides are evenly coated. Tap off any excess sugar. If using optional coatings, roll the pieces immediately after shaping.
- Place the finished candies onto a plate or baking sheet lined with wax paper. Store the candy in an airtight container in the refrigerator to maintain its shape and texture. It will last for up to 10 days.