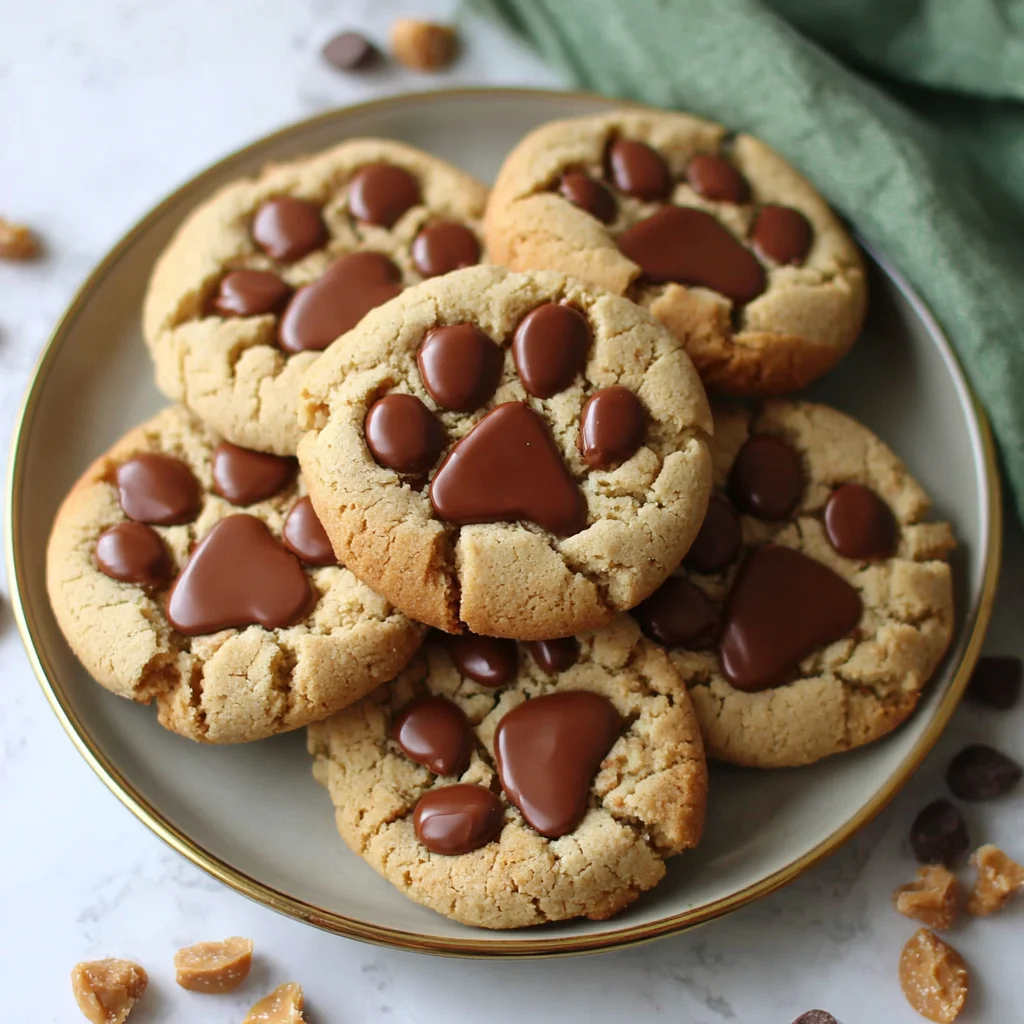
There are few desserts that instantly bring a smile to everyone’s face quite like a homemade peanut butter cookie. Now, imagine taking that perfect, chewy, and rich flavor profile and adding an element of irresistible charm. Welcome to the world of Peanut Butter Paw Print Cookies the treat that’s just as fun to look at as it is to eat! Whether you are a dedicated dog lover, planning a themed party, or simply seeking a unique twist on a classic recipe, these cookies deliver on every front: flavor, texture, and visual appeal.
This recipe transforms a simple, soft peanut butter cookie dough into an adorable masterpiece by adding a chilled peanut butter ‘pad’ and mini chocolate chip ‘toes’ right after baking. The contrast of the warm, buttery cookie and the slightly firmer peanut butter center is pure magic. We are moving beyond the standard criss-cross pattern and creating something truly special that will make you the star of any bake sale or family gathering. Get ready to bake a batch of the cutest, most delicious cookies you’ve ever tasted. We promise, these Peanut Butter Paw Print Cookies are destined to become a staple in your recipe rotation.
Why You’ll Love These Irresistible Peanut Butter Paw Print Cookies
When it comes to cookies, everyone has their preference: crispy edges, chewy centers, or an overload of flavor. These Peanut Butter Paw Print Cookies manage to hit all the high notes simultaneously, making them universally beloved. But what truly sets this recipe apart from the countless other peanut butter cookie recipes out there?
Firstly, let’s talk texture. We utilize a combination of softened butter and generous amounts of both granulated and brown sugar, which results in a luxuriously soft and chewy interior. Unlike some recipes that yield dry or crumbly cookies, ours maintain a moist center even days after baking. The moment you bite into one of these, you experience that satisfying chewiness that defines a perfect homemade cookie.
Secondly, the flavor depth is unparalleled. Using a full cup of creamy peanut butter in the dough ensures the rich, nutty flavor is prominent in every single bite. This isn’t just a cookie with a hint of peanut butter; this is a true celebration of peanut butter! The sweetness is expertly balanced by the pinch of salt and the molasses notes from the brown sugar, creating a sophisticated yet comforting taste.
But the real reason this recipe shines is the addition of the “paw print” topping. While the cookies are still warm from the oven, we press in a small, chilled ball of extra peanut butter (the paw pad) and three mini chocolate chips (the toes). This step is revolutionary. The residual heat from the cookie slightly melts the chilled peanut butter, bonding it beautifully to the surface, and ensuring the topping stays soft and delightful. The mini chocolate chips introduce a subtle chocolate note that perfectly complements the rich peanut butter, creating that classic flavor pairing we all adore.
Furthermore, the visual appeal is simply unmatched. These aren’t just cookies; they are conversation starters. The adorable paw print design makes them ideal for gifting, themed birthday parties, or just brightening up a regular weeknight dessert. If you are looking for soft peanut butter cookies that are both delicious and decorative, you have found your holy grail recipe. The joy of presenting a tray of these charming Peanut Butter Paw Print Cookies is half the fun!
Why You Should Try Making These Easy Paw Print Cookies Today
In a world saturated with complex baking projects, sometimes you just need a straightforward, reliable recipe that delivers spectacular results. These easy Peanut Butter Paw Print Cookies are exactly that. They require common pantry staples and offer a quick baking time, making them perfect for busy weeknights or spontaneous weekend baking sessions. You don’t need expert skills just a love for delicious treats and a few simple steps.
One primary reason to try this recipe now is its sheer versatility. While they are perfect for cozy, comforting moments, their unique design makes them fantastic for celebratory events. Hosting a puppy-themed party? Need a delightful dessert for a family movie night? Looking for a thoughtful homemade gift for an animal lover? These Peanut Butter Paw Print Cookies fit the bill perfectly. They stand out on any dessert table, inviting guests to admire their cute design before they even take a bite.
Moreover, this recipe is an excellent project for baking with children. The steps involved are simple and engaging. Kids can help measure ingredients, cream the butter and sugar, roll the dough balls, and, most importantly, they can take charge of the decorating phase gently pressing the peanut butter centers and placing the chocolate chip “toes.” Making these cookies becomes a cherished memory, not just a baking task.
For those interested in maximizing flavor, using quality ingredients truly shines here. This recipe for soft peanut butter cookies ensures that every element, from the creamy peanut butter base to the soft texture, is optimized. The use of baking soda, specifically, contributes to the soft lift and slightly crisp edge that prevents the cookie from spreading too flat, maintaining that desirable plump cookie shape.
Finally, these cookies offer a sense of novelty. While everyone loves a classic peanut butter cookie, the incorporation of the extra chilled peanut butter pad is a genius hack. It provides an extra burst of concentrated peanut butter flavor right in the center, differentiating these significantly from a typical chocolate chip peanut butter cookie. If you’ve been searching for a reliable, fun, and delicious cookie recipe, look no further. Dive into the simple pleasure of making these delightful treats.
Ingredients and Essential Utensils for Perfect Peanut Butter Paw Print Cookies
Success in baking begins with precise measurement and high-quality ingredients. For the best Peanut Butter Paw Print Cookies, ensure all your dairy ingredients are at the specified temperature, especially the butter, which must be softened but not melted. This consistency is crucial for creating the light, fluffy texture during the creaming process.
Detailed Ingredient List
Here is everything you need to bake a batch of soft, chewy, and adorable paw print cookies:
For the Cookies:
- 1 cup (2 sticks) unsalted butter, softened: It is vital that the butter is truly softened, meaning it yields easily when lightly pressed but is not greasy or melted. Room temperature butter incorporates air during creaming, which gives the cookies their lift and tender crumb. Using unsalted butter allows you to control the total amount of salt in the recipe.
- 1 cup creamy peanut butter: Choose a standard, processed creamy peanut butter (like Jif or Skippy) rather than natural or organic varieties where the oil separates. Natural peanut butter often results in a drier, crumblier cookie texture due to its different oil content.
- 1 cup granulated white sugar: Provides sweetness and helps the cookies spread slightly.
- 1 cup packed light brown sugar: This is key to achieving that soft, chewy texture. Brown sugar contains molasses, which adds moisture, depth of flavor, and chewiness to the cookie structure. Always make sure to pack it firmly into the measuring cup.
- 2 large eggs: Act as binders and provide structure. Ensure they are at room temperature so they incorporate smoothly into the creamed butter mixture without curdling.
- 1 tablespoon vanilla extract: A crucial flavor enhancer. Don’t skimp on the quality; good vanilla complements the richness of the peanut butter perfectly.
- 3 cups all-purpose flour: Provides the structure. Ensure you measure the flour correctly spoon it lightly into the measuring cup and level it off with a knife, do not scoop directly from the bag, as this compacts the flour and can result in dense, dry cookies.
- 2 teaspoons baking soda: This leavening agent reacts with the acidity in the brown sugar to give the cookies their necessary lift and contributes to a beautiful, slightly domed shape.
- 1 teaspoon salt: Essential for balancing the intense sweetness of the sugars and the richness of the peanut butter.
For the Paw Prints:
- 1/4 cup creamy peanut butter (extra, kept slightly chilled): This separate portion is exclusively for the paw pads. It needs to be slightly chilled so you can roll it into neat, pea-sized balls immediately after the cookies come out of the oven. If it’s too warm, it will be sticky and messy.
- 1/2 cup mini chocolate chips: The perfect size for creating the delicate ‘toes’ of the paw print. You could use regular-sized chocolate chips if you prefer a bolder chocolate presence, but mini chips offer a daintier, more realistic paw print shape.
Recommended Tools and Utensils for a Smooth Baking Process
Having the right equipment ensures your baking process is efficient and your Peanut Butter Paw Print Cookies turn out consistently perfect.
- Electric Mixer (Stand or Handheld): Absolutely necessary for creaming the butter and sugars until they are light and fluffy a critical step for soft cookies.
- Large Mixing Bowl: For the wet ingredients and the final dough assembly.
- Medium Separate Bowl: For whisking the dry ingredients. Combining the flour, leavening agents, and salt separately ensures they are evenly distributed throughout the dough, preventing pockets of unmixed ingredients.
- Rubber Spatula: Indispensable for scraping down the sides of the bowl during mixing and for folding in the flour mixture at the end.
- Baking Sheets: Two or three large, light-colored baking sheets are ideal. Light sheets prevent the bottoms of the cookies from browning too quickly.
- Parchment Paper or Silicone Mats: Essential for lining the baking sheets. This prevents sticking, ensures even heat distribution, and makes cleanup incredibly easy.
- Small Cookie Scoop (1.5 tablespoons): Using a scoop is the best way to ensure uniform cookie size. Uniformity is crucial for even baking, guaranteeing all your Peanut Butter Paw Print Cookies are done at the same time.
- Wire Cooling Rack: Necessary for cooling the cookies completely after they have firmed up slightly on the baking sheet.
- Measuring Cups and Spoons: For accurate ingredient quantities. Remember, baking is a science, and precision is paramount for successful results.
Investing in a good set of kitchen scales can also further enhance accuracy, especially when dealing with flour, ensuring your soft peanut butter cookies achieve the perfect crumb structure. By preparing your mise en place (all ingredients measured and ready) and having these essential tools handy, you set yourself up for baking success!
Detailed Step-by-Step Guide to Baking the Best Peanut Butter Paw Print Cookies
Creating these adorable treats is a joyful process, but paying attention to the details in the steps below will ensure your Peanut Butter Paw Print Cookies are perfectly soft, chewy, and beautifully formed.
Step 1: Preheat and Prepare the Baking Environment
- Preheat your oven to 350°F (175°C). This temperature is ideal for achieving a cookie that is soft on the inside but lightly golden on the edges.
- Line two or three large baking sheets with parchment paper or silicone baking mats. This crucial step prevents the dough from sticking and helps distribute heat evenly, resulting in perfectly baked cookies. Set the prepared sheets aside.
Step 2: Cream the Wet Ingredients (The Foundation of Soft Cookies)
- In a large mixing bowl, combine the softened butter, 1 cup of creamy peanut butter, granulated white sugar, and packed light brown sugar.
- Using an electric mixer (stand mixer fitted with the paddle attachment or a handheld mixer) on medium speed, cream these ingredients together. This process should take approximately 2 to 3 minutes. Stop when the mixture is visibly lighter in color and fluffy in texture. This step incorporates air, which contributes to the final soft texture of the Peanut Butter Paw Print Cookies.
- Add the two large eggs, one at a time, mixing well after each addition until the yolk is fully incorporated.
- Stir in the vanilla extract until fully incorporated. Crucial Tip: Use a rubber spatula to scrape down the sides and bottom of the bowl frequently to ensure all ingredients are evenly mixed.
Step 3: Combining the Dry Ingredients Carefully
- In a separate medium bowl, whisk together the all-purpose flour, baking soda, and salt. Whisking ensures the leavening agent and salt are evenly dispersed.
- Gradually add the dry ingredient mixture into the wet ingredient mixture. Switch your mixer to low speed and mix only until the flour streaks disappear and the ingredients are just combined.
- Do not overmix the dough! Overmixing develops the gluten in the flour, leading to tough, dense cookies rather than the soft peanut butter cookies we are aiming for. The dough should be thick and slightly crumbly, but hold together when pressed.
Step 4: Shaping and Preparing for Baking
- Use a small cookie scoop (about 1.5 tablespoons) or roll the dough by hand into uniform balls. Uniform size is key for consistent baking.
- Place the cookie dough balls onto the prepared baking sheets, ensuring they are spaced about 2 inches apart to allow for spreading. Do not flatten the balls; leave them rounded.
- Pro Tip: For extra chewy cookies, you can optionally chill the dough for 30 minutes at this stage. This prevents excessive spreading, resulting in thicker, richer cookies.
Step 5: Bake the Cookies to Perfection
- Bake the cookies for 9 to 11 minutes.
- Look for visual cues: the edges should be lightly golden brown, but the centers should still look slightly soft, puffy, and underbaked. This ensures a perfectly soft and chewy texture once cooled.
- Remove the baking sheets from the oven and immediately place them on a cooling rack or a heat-safe surface.
Step 6: The Crucial Step: Creating the Paw Pad Center
This step must be done quickly while the cookies are piping hot and still pliable.
- Retrieve the 1/4 cup of extra chilled peanut butter. If it was refrigerated, it should be firm enough to handle.
- Quickly roll this chilled peanut butter into very small, uniform, pea-sized balls. These will serve as the central pad of the paw.
- Gently press one small peanut butter ball into the center of each warm cookie. The warmth of the cookie is essential here it will slightly melt the chilled peanut butter, adhering it securely to the cookie and giving it that unique, soft center.
Step 7: Adding the Toes
- For the “toes” that complete the look of the Peanut Butter Paw Print Cookies, take three mini chocolate chips.
- Arrange the mini chocolate chips in an arc shape directly above the central peanut butter pad on each cookie.
- Press them gently into the cookie so they stick firmly. Repeat this process for all baked cookies.
Step 8: Cool Completely and Set
- Allow the cookies to cool completely on the baking sheet for at least 10 minutes. This is vital for the structure of the soft cookie and to ensure the paw prints are fully set and don’t slide off.
- Carefully transfer the cookies to a wire rack to finish cooling completely.
- Store cooled Peanut Butter Paw Print Cookies in an airtight container at room temperature for up to 5 days. For other great baking ideas, check out this recipe for Classic Peanut Butter Cookies.
Tips, Variations, and Troubleshooting for Peanut Butter Paw Print Cookies
While this recipe for Peanut Butter Paw Print Cookies is straightforward, a few expert tips can elevate your baking experience. Understanding common issues and knowing how to adjust the ingredients allows you to customize this adorable treat for any dietary need or flavor preference.
Essential Baking Tips to Avoid Common Mistakes
1. Ensure Ingredients Are at Room Temperature: This is the number one rule for soft, light cookies. If your eggs or butter are cold, they won’t emulsify correctly with the sugar, resulting in a dense, poorly textured dough. If you forget to take your eggs out, place them in a bowl of warm water for 5 minutes.
2. Measure Flour Correctly: As mentioned, too much flour is the quickest route to dry cookies. Use the “spoon and level” method: lightly spoon the flour into your measuring cup until overflowing, then sweep the excess off with a straight edge. Never scoop the flour directly.
3. Don’t Skip the Chilled Peanut Butter: The 1/4 cup of peanut butter used for the paw pad must be chilled. If you use room-temperature peanut butter, it will be too soft and sticky to roll into neat balls, and it will melt too quickly on the hot cookie, obscuring the shape of the paw print.
4. Monitor Baking Time Closely: Soft peanut butter cookies are achieved by slightly underbaking them. If the cookies look fully done in the oven, they will be overbaked once cooled. Pull them out when the edges are set and the center still looks slightly wet or puffy. They will finish cooking on the hot baking sheet.
Delicious Variations and Alternative Ingredients
These Peanut Butter Paw Print Cookies are wonderfully adaptable. Here are a few ways to switch up the ingredients or design:
- Gluten-Free Paw Prints: Easily convert this recipe by swapping the all-purpose flour for a high-quality 1:1 gluten-free baking blend that includes xanthan gum. The rest of the ingredients and instructions remain the same.
- Vegan Adaptation: Replace the dairy butter with a solid plant-based butter stick (not margarine). Replace the two large eggs with flax eggs (2 Tbsp flaxseed meal mixed with 6 Tbsp water, allowed to sit for 5 minutes). Ensure your peanut butter does not contain hidden dairy.
- Alternative “Toes”: If you’re out of mini chocolate chips, you can use chocolate sprinkles (arranged in sets of three), small M&M minis, or even tiny pieces of pretzel sticks for a salty crunch.
- Double Chocolate Paw Prints: Replace 1/4 cup of the all-purpose flour with 1/4 cup of unsweetened cocoa powder to give the base cookie a rich chocolate flavor, making them Chocolate Chip Peanut Butter Cookies with a twist.
- Nut Butter Swap: If allergies allow, or if you prefer a different flavor, almond butter or sunflower butter can be used instead of peanut butter, though the flavor and spread might vary slightly.
Troubleshooting: The Dreaded Cookie Spread
If your cookies spread too thin, resulting in crispy rather than soft cookies, try these fixes:
- Check your Butter: Was the butter too soft? If the butter is greasy, the fat content is too high, causing excessive spread.
- Add More Flour (Carefully): If you live in a humid environment, you might need an extra tablespoon of flour (3 cups + 1 Tbsp) to tighten the dough.
- Chill Time: Always chill the dough for at least 30 minutes. This solidifies the fat, allowing the cookies to set before they start spreading in the heat.
Nutritional Values and the Delicious Benefits of Peanut Butter
While these Peanut Butter Paw Print Cookies are undeniably a delicious indulgence, it’s worth noting the core ingredient peanut butter brings several nutritional benefits to the table. Understanding the components of this dessert helps integrate it into a balanced diet while still enjoying every bite.
Estimated Nutritional Breakdown (Per Cookie, based on 30 servings)
Since the exact calorie count depends heavily on the size of the scoop and the brand of ingredients used, the following values are approximate and based on standard baking ratios:
- Calories: Approximately 180–220 calories per cookie.
- Fats: 10–13 grams (Peanut butter is rich in monounsaturated and polyunsaturated fats the “good fats” which are beneficial for heart health).
- Carbohydrates: 20–25 grams (Primarily from the sugars and flour).
- Protein: 4–5 grams (A surprisingly good source of plant-based protein, thanks to the high volume of peanut butter).
The Benefits of Baking with Peanut Butter
Peanut butter is not just a flavor powerhouse; it’s a source of valuable nutrients that contribute to the overall satiety and energy provided by these Peanut Butter Paw Print Cookies:
1. Excellent Source of Protein: Peanut butter is famously packed with protein, which helps build and repair tissues and keeps you feeling full longer. Compared to a standard sugar cookie, these soft peanut butter cookies offer a significantly higher protein content.
2. Heart-Healthy Fats: The fats found in peanut butter oleic acid, in particular are linked to improved cholesterol levels and reduced risk of heart disease. While the cookies do contain butter (saturated fat), the healthy fats from the peanut butter help balance the fat profile.
3. Rich in Vitamins and Minerals: Peanut butter provides a good amount of Vitamin E, an antioxidant, and B vitamins, particularly niacin (B3) and folate (B9), which are crucial for metabolism and cellular function. They also contain magnesium, a mineral vital for muscle and nerve function.
4. Fiber Content: While not a high-fiber food, the peanut butter contributes a small amount of dietary fiber, which aids in digestion.
5. Energy Boost: The combination of carbohydrates (from sugar and flour), fats, and protein makes these Peanut Butter Paw Print Cookies an excellent treat for sustained energy, perfect for a mid-afternoon pick-me-up or a post-activity snack. Enjoying a homemade dessert like this is also beneficial for mental well-being, providing a satisfying and comforting experience.
Remember that enjoying treats like these in moderation is key. They are a delightful way to satisfy a craving while incorporating the benefits of nuts into your diet. For more rich and indulgent baking ideas, be sure to check out our recipe for Chocolate Gooey Butter Cookies.
FAQs About Baking Peanut Butter Paw Print Cookies
Here are answers to some of the most common questions bakers have when preparing these popular and adorable treats, optimized with Schema markup for better search visibility.
How do I keep my Peanut Butter Paw Print Cookies soft and chewy?
The secret to soft cookies lies in three main areas: using packed brown sugar for moisture, avoiding overmixing the dough (which toughens gluten), and most importantly, slightly underbaking them. Remove them from the oven when the centers are still puffy and just barely set.
Can I use natural peanut butter for the dough?
It is highly recommended to use processed, creamy peanut butter (like Jif or Skippy) for the cookie dough. Natural peanut butter tends to separate and has a higher oil content, often resulting in a dry, crumbly dough that spreads unpredictably. Save the natural peanut butter for toast!
Do I have to chill the cookie dough before baking these soft peanut butter cookies?
While this recipe doesn’t strictly require chilling, a quick 30-minute chill helps solidify the fats, ensuring the Peanut Butter Paw Print Cookies spread less and remain thicker and chewier. If your dough feels particularly soft or sticky, definitely chill it before forming the balls.
What can I use instead of mini chocolate chips for the paw print toes?
If you don’t have mini chocolate chips, you can use other small toppings. Options include mini M&Ms, small drops of melted chocolate piped on with a toothpick, or even small pieces of pretzel sticks if you like a little saltiness. The key is to keep the pieces small to maintain the delicate paw print appearance.
How should I store leftover Peanut Butter Paw Print Cookies?
Once completely cooled, store the cookies in an airtight container at room temperature. They will retain their freshness and soft texture for up to 5 days. For longer storage, they freeze wonderfully; simply place them in a freezer bag or container for up to three months.
Why do the paw prints need to be added while the cookies are hot?
Adding the chilled peanut butter pad and chocolate chip toes immediately when the cookies are hot is essential because the heat slightly melts the ingredients and creates a natural adhesive. If you wait until the cookies are cool, the paw print details won’t stick properly and will likely fall off.
Conclusion: Baking Joy with Peanut Butter Paw Print Cookies
Baking is more than just combining ingredients; it’s about creating moments of joy and sharing delicious experiences. These Peanut Butter Paw Print Cookies embody that spirit perfectly they are a delightful blend of classic comfort flavor and irresistible charm. From the moment you mix the fragrant, soft peanut butter cookie dough to the final decorative touch of the mini chocolate chip toes, this recipe is guaranteed to bring warmth and happiness to your kitchen.
We’ve walked through every essential step, emphasizing the importance of soft ingredients, the magic of the brown sugar, and the critical timing required to create that signature paw print design. By following these guidelines, you are assured of producing perfectly soft, chewy, and highly impressive homemade peanut butter cookies that will undoubtedly earn you compliments.
Whether you’re making them for a holiday platter, a school event, or just satisfying a deep-seated peanut butter craving, these cookies are a guaranteed hit. Don’t settle for the plain old criss-cross design when you can create something this memorable and unique. Grab your ingredients, preheat your oven, and prepare for a baking adventure that ends in the most adorable treat imaginable.
We absolutely encourage you to try this recipe for Peanut Butter Paw Print Cookies! If you love this recipe, please share your success stories and pictures in the comments below! And for more seasonal baking inspiration and fun ideas, don’t forget to follow me on Pinterest for recipes and tips. Happy baking!
Irresistible Peanut Butter Paw Print Cookies
Ingredients
Equipment
Method
- Preheat your oven to 350°F (175°C). Line two or three large baking sheets with parchment paper or silicone baking mats. Set aside.
- In a large mixing bowl, use an electric mixer on medium speed to cream together the softened butter, 1 cup of peanut butter, granulated white sugar, and light brown sugar until the mixture is light and fluffy (approximately 2 to 3 minutes). Add the two large eggs, one at a time, mixing well after each addition. Stir in the vanilla extract until fully incorporated. Scrape down the sides of the bowl as needed.
- In a separate medium bowl, whisk together the all-purpose flour, baking soda, and salt. Gradually add the dry ingredient mixture into the wet ingredient mixture, mixing on low speed until just combined. Be careful not to overmix the dough.
- Using a small cookie scoop (about 1.5 tablespoons) or rolling the dough by hand, form the dough into uniform balls. Place the cookie dough balls onto the prepared baking sheets, spacing them about 2 inches apart.
- Bake the cookies for 9 to 11 minutes, or until the edges are lightly golden brown and the centers are still slightly soft. Remove the baking sheets from the oven and immediately place them on a cooling rack.
- While the cookies are still very hot, take the 1/4 cup of extra chilled peanut butter and roll it into very small pea-sized balls (these will be the center pads of the paw). Gently press one small peanut butter ball into the center of each warm cookie. The warmth of the cookie will slightly soften the peanut butter and adhere it to the cookie.
- For the 'toes,' take three mini chocolate chips and arrange them in an arc directly above the central peanut butter pad on each cookie. Press them gently into the cookie so they stick. Repeat this process for all baked cookies.
- Allow the cookies to cool completely on the baking sheet for 10 minutes before transferring them carefully to a wire rack to finish cooling. This ensures the cookies and the paw prints are fully set. Store cooled cookies in an airtight container at room temperature.