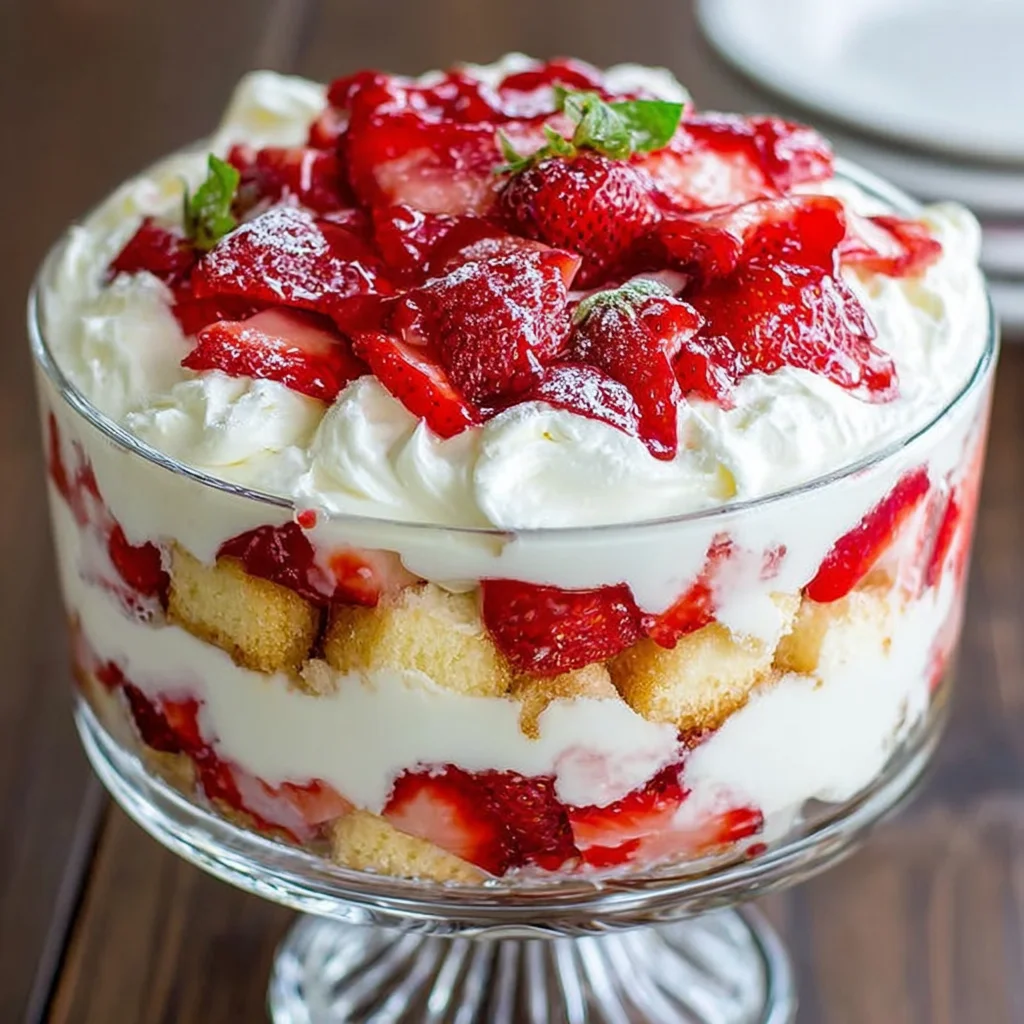
Few desserts capture the essence of summer entertaining quite like a magnificent trifle. It’s a showstopper a clear glass bowl showcasing towering, vibrant layers of cake, fruit, and cream yet it requires absolutely zero baking skill (beyond thawing a pound cake!). This recipe for Strawberry Cheesecake Trifle takes the classic English trifle concept and elevates it with a creamy, rich, and tangy no-bake cheesecake filling that is utterly irresistible. Forget complicated water baths and oven timers; this dessert is designed for maximum flavor and minimal fuss, making it the perfect centerpiece for barbecues, holiday tables, or any occasion that demands something spectacularly delicious and easy to prepare.
Imagine spooning through a velvety layer of whipped cream, followed by the soft, sweet tang of cheesecake, then hitting the burst of fresh, syrup-soaked strawberries, all anchored by a moist foundation of pound cake. That, dear reader, is the experience waiting for you. The chilling time is mandatory, as it allows the strawberry juices to permeate the cake and the cheesecake filling to fully set, resulting in a cohesive, scoopable dessert that tastes even better the next day. Get ready to assemble your new favorite summer treat!
Why You’ll Fall in Love with this Dreamy Strawberry Cheesecake Trifle
When you seek an effortlessly elegant dessert that truly impresses guests, the Strawberry Cheesecake Trifle is the unrivaled champion. This recipe provides a masterful balance of textures and flavors that traditional desserts often lack. You get the richness of cheesecake, the freshness of summer berries, and the lightness of homemade whipped cream, all in one glorious bite.
The Perfect Marriage of Cheesecake and Trifle
Unlike a standard trifle, which often uses simple custard or pudding, this recipe features a decadent, no-bake cheesecake filling. This crucial component is made by whipping softened full-fat cream cheese with sour cream and powdered sugar, then folding in a portion of freshly made whipped cream. The result is a filling that is simultaneously rich, tangy, and incredibly light it doesn’t sit heavy on the palate. This unique filling sets beautifully after a few hours in the refrigerator, providing structural integrity to the layers while delivering that signature cheesecake flavor profile.
Effortless Elegance and No Oven Required
The best part about this dessert is its accessibility. If you can handle a whisk and a rubber spatula, you can master this trifle. By utilizing a store-bought, thawed pound cake, we eliminate the need for baking. All the effort is focused on preparation slicing fruit, whipping cream, and mixing the filling. This makes the Strawberry Cheesecake Trifle an ideal choice during the sweltering summer months when turning on the oven is the last thing you want to do. The assembly itself is also quite therapeutic: stacking the layers in a clear glass bowl is satisfying and guarantees a spectacular visual outcome.
Maximum Flavor Development Through Maceration
The secret weapon in this dessert is the process of strawberry maceration. By allowing the sliced strawberries to sit with sugar and lemon juice for 30–45 minutes, the sugar draws out the natural moisture, creating a beautiful, ruby-red syrup. This syrup is then layered with the cake, turning plain pound cake into a moist, flavor-infused foundation. This simple technique ensures that every piece of cake is saturated with sweet, bright strawberry flavor, preventing the dry edges often found in less thoughtful layered desserts. For more flavor-packed ideas, exploring other homemade strawberry jam recipes can provide inspiration for future fruit variations.
Why You Should Make This Stunning Layered Dessert Today
Beyond being delicious, the Strawberry Cheesecake Trifle offers several practical advantages for the home cook and host. It solves common entertaining dilemmas and provides an adaptable base for creativity. When planning a gathering, having a dessert that is beautiful, easy, and can be completely finished hours or even a full day before guests arrive is invaluable.
The Ultimate Make-Ahead Marvel
In the world of entertaining, desserts that must be served fresh from the oven are high maintenance. The trifle, however, demands time to rest. Refrigerating the trifle is not just recommended; it is mandatory for success. A minimum of four hours and ideally overnight (8–12 hours) allows the flavors to fully meld, the cream cheese to firm up, and the cake to absorb the moisture from the strawberry syrup and cheesecake filling. This means you can assemble the entire masterpiece the night before your event, freeing up precious time on the day of the party to focus on the main course or other festive appetizer ideas.
A Versatile Canvas for Creativity
While the classic combination of strawberry and cheesecake is perfect, the structure of the trifle allows for incredible versatility. You can easily swap out the fruit depending on the season, making this a perennial favorite. Imagine a peach trifle in late summer, or a chocolate cherry trifle in the winter. The cheesecake filling remains the constant, providing a neutral yet rich backdrop for any flavor combination. This adaptability means this single recipe can become the basis for dozens of future dessert ideas, ensuring your dessert table is never boring.
An Impressive Presentation Without the Fuss
The beauty of a trifle bowl is that it does all the work for you. The clear glass sides transform simple ingredients into a visually arresting display. The stark contrast between the white cream, the pale yellow cake, and the brilliant red strawberries creates an immediate “wow” factor. Unlike complicated tiered cakes or molded gelatin desserts, the trifle looks sophisticated merely by being layered simply. For inspiration on layering techniques and stunning plating ideas, be sure to check out our collection of stunning layered dessert visuals on Pinterest.
The Comfort of Creaminess and Cake
Finally, there’s the pure comfort factor. Trifle is the definition of comfort food presented elegantly. It appeals to all ages and preferences from those who crave a light, fruity dessert to those who seek the dense satisfaction of a rich cheesecake. When you dive into this Strawberry Cheesecake Trifle, you are experiencing a delightful mix of creamy, soft, and juicy elements that guarantee satisfaction without the heavy feeling of a slice of traditional baked cheesecake or overly rich cake.
If you enjoy simple yet decadent desserts, you might also be interested in trying other easy no-bake treats that utilize simple pantry staples to create stunning results.
Ingredients and Necessary Utensils for Your No-Bake Strawberry Cheesecake Trifle
Success in making a truly magnificent Strawberry Cheesecake Trifle starts with high-quality ingredients and having the right tools on hand. This dessert relies on texture and fresh flavor, so ingredient quality especially the coldness of the cream and the softness of the cream cheese is paramount.
Essential Ingredients List
A detailed list of ingredients, grouped by component, ensuring you have everything ready before you start assembling your glorious layered dessert.
For the Pound Cake Base
- 1 (10-ounce) frozen pound cake, thawed: High quality is key here, as the cake provides structure and moisture absorption. Using a frozen cake ensures a consistent crumb when thawed.
- 1/4 cup heavy cream or milk (optional): Used for lightly brushing or drizzling the cake layers, which helps them absorb the strawberry juices more effectively and prevents dryness.
For the Macerated Strawberries (The Flavor Bomb)
- 2 pounds fresh strawberries, hulled and sliced: Choose ripe, firm strawberries. They should be vibrant red and smell sweet.
- 1/2 cup granulated sugar: The sugar draws out the fruit’s moisture, creating the essential syrup.
- 1 teaspoon fresh lemon juice (optional): A small amount brightens the natural flavor of the strawberries and balances the sweetness of the sugar. Highly recommended!
For the No-Bake Cheesecake Filling (The Creamy Heart)
- 2 (8-ounce) packages full-fat cream cheese: Crucial Tip: Must be softened completely to room temperature. Cold cream cheese will result in lumps, ruining the silky texture of the filling.
- 1 1/2 cups powdered sugar, sifted: Sifting prevents clumps and ensures a smooth, airy filling.
- 1 teaspoon pure vanilla extract: Use pure extract for the best flavor depth.
- 1/4 cup sour cream: This ingredient adds a delightful tanginess that cuts through the richness of the cream cheese, mimicking the flavor profile of a baked cheesecake.
For the Whipped Cream Layers (The Fluffy Cloud)
- 3 cups heavy whipping cream, cold: The cream must be very cold to whip successfully into stiff peaks.
- 1/2 cup powdered sugar (additional): Sweetens the plain whipped cream used for the layers and the top decoration.
Recommended Tools and Utensils
Having the right kitchen gadgets will simplify the process, especially when dealing with whipping cream and mixing a smooth cheesecake base. Preparation is streamlined when these items are readily available.
Necessary Tools for Trifle Assembly
- Large, clear glass trifle bowl (essential): This is the star vessel! Standard trifle bowls hold 3–4 quarts (12–16 cups) and are necessary to show off the beautiful layers.
- Stand Mixer or High-Powered Hand Mixer: Necessary for whipping the large amount of cream and ensuring the cream cheese filling is perfectly smooth.
- Whisk Attachment and Paddle Attachment (if using a stand mixer): The whisk is for the cream; the paddle is for the dense cream cheese.
- Large Mixing Bowls (2 minimum): One for the strawberries, one for the cream cheese mixture, and the mixer bowl for the cream.
- Rubber Spatula: Vital for gently folding the whipped cream into the cheesecake mixture without deflating the air, ensuring a light filling.
- Sharp Knife and Cutting Board: For preparing and slicing the strawberries and the pound cake.
- Sifter or Fine Mesh Strainer: For sifting the powdered sugar.
Gathering all your tools and ingredients before starting (a concept known as “mise en place”) will make the assembly of the Strawberry Cheesecake Trifle seamless and enjoyable. Remember, the quality of your whipped cream and the smoothness of your cheesecake filling are the two factors that determine whether this dessert is good or truly spectacular.
Detailed Step-by-Step Instructions for the Perfect Strawberry Cheesecake Trifle
Follow these detailed steps closely to achieve beautifully defined layers, a perfectly textured filling, and a truly unforgettable Strawberry Cheesecake Trifle.
Step 1: Prepare the Macerated Strawberries
- Combine Ingredients: In a medium bowl, gently combine the 2 pounds of sliced strawberries, the 1/2 cup of granulated sugar, and the optional (but highly recommended) teaspoon of fresh lemon juice.
- Toss Gently: Use a rubber spatula to gently toss the strawberries until all the slices are coated with sugar.
- Macerate: Set the bowl aside at room temperature for at least 30 to 45 minutes. This is the crucial step where the sugar draws out the juices, creating a flavorful syrup. You will notice a significant pool of liquid forming at the bottom of the bowl. Do not drain this syrup; it is essential for moisturizing the cake layers.
Step 2: Prepare the Whipped Cream Layers
The success of the fluffy layers hinges on using extremely cold heavy cream.
- Start Whipping: Pour the 3 cups of cold heavy whipping cream into the bowl of a stand mixer fitted with the whisk attachment (or use a large bowl and a hand mixer). Begin whipping on medium speed until soft peaks start to form the cream will hold its shape momentarily but the tips will droop.
- Sweeten and Finish: Gradually add the 1/2 cup of additional powdered sugar and increase the speed to medium-high. Continue whipping until firm, stiff peaks form. When you lift the whisk, the peaks should stand upright without curling over.
- Reserve Cream: Crucial Step: Immediately reserve 1 1/2 cups of the finished whipped cream. Transfer this reserved portion to a separate container and refrigerate it. This will be used exclusively for the final topping and decoration. The remaining whipped cream stays in the mixer bowl for the cheesecake filling.
Step 3: Craft the No-Bake Cheesecake Filling
Achieving a smooth, light cheesecake filling requires care, especially when mixing the softened cream cheese.
- Beat the Cream Cheese: In a separate large bowl (or using the paddle attachment on the stand mixer), beat the two packages of fully softened cream cheese until it is exceptionally smooth and fluffy. Scrape down the sides of the bowl often to ensure no lumps remain. This may take 2–3 minutes.
- Add Sweeteners and Flavor: Add the 1 1/2 cups of sifted powdered sugar and the vanilla extract. Beat until fully incorporated and the mixture looks light and airy.
- Incorporate Tanginess: Mix in the 1/4 cup of sour cream until just combined. Over-mixing at this stage can affect the texture.
- Fold in Whipped Cream: Take the remaining whipped cream from Step 2 (the amount not reserved for topping) and gently fold it into the cream cheese mixture using a large rubber spatula. Use a cutting and folding motion, rotating the bowl as you go. Gentleness is key! This preserves the air in the cream, keeping the cheesecake filling light. Stop folding the moment there are no visible streaks of plain cream cheese.
Step 4: Prepare the Pound Cake Base
- Slice or Cube: Slice the thawed pound cake into 3/4-inch thick slices. For easier assembly and scooping, many prefer cutting the slices into bite-sized cubes.
- Layer the Base: Line the bottom of your large, clear glass trifle bowl with the pound cake pieces. If using slices, trim them as needed to fit snugly. If using cubes, spread an even layer across the bottom.
- Add Moisture (Optional but recommended): Lightly drizzle or brush the cake layer with a tablespoon or two of the extra heavy cream or milk. Alternatively, you can use a small amount of the strawberry juice from Step 1 to add immediate strawberry flavor to the cake.
Step 5: Assemble the Trifle Layers
The assembly should be swift and careful to maintain distinct layers. Work directly into the trifle bowl.
- First Layer (Cheesecake): Carefully spread half of the cheesecake filling evenly over the top of the pound cake base. Use the back of a spoon or a small offset spatula.
- Second Layer (Strawberries): Spoon half of the macerated strawberries, ensuring you include a generous amount of the glorious syrup/juice, over the top of the cheesecake layer.
- Third Layer (Cake): Add a second layer of pound cake slices or cubes over the strawberries.
- Fourth Layer (Cheesecake): Spread the remaining half of the cheesecake filling evenly over the second cake layer.
- Fifth Layer (Strawberries): Top the remaining cheesecake filling with the rest of the strawberries and all their accumulated juices.
- Final Layer (Whipped Cream Topping): Retrieve the 1 1/2 cups of reserved whipped cream. Spread it evenly over the top of the entire trifle. For an elegant presentation, you can use a piping bag fitted with a star tip to pipe swirls of cream on the surface.
- Garnish: Decorate the top with a few whole fresh strawberries, additional strawberry slices, or even a dusting of graham cracker crumbs for texture.
Step 6: Chill and Serve
- Refrigerate: Cover the assembled Strawberry Cheesecake Trifle loosely with plastic wrap (to prevent the cream from sticking).
- Chill Time: Refrigerate the trifle for a minimum of 4 hours, but ideally 8 hours or overnight. This extended chilling time is vital; it allows the cake to fully absorb the strawberry and cream moisture, ensuring the trifle holds its structure when scooped and the flavors are fully developed.
- Serve: Serve chilled directly from the trifle bowl.
Tips, Troubleshooting, and Delicious Variations for Your Trifle
While the Strawberry Cheesecake Trifle is fundamentally simple, a few professional tips can elevate your results. Knowing how to handle ingredient substitutions and prevent common pitfalls ensures perfection every time.
Troubleshooting Common Trifle Issues
Preventing Lumps in the Filling: The biggest mistake home cooks make is using cold cream cheese. If the cream cheese is not truly room temperature, lumps will form that are impossible to beat out. Plan ahead; take the cream cheese out 2–3 hours before starting.
Avoiding a Runny Trifle: A runny trifle is usually caused by two things: not whipping the cream to stiff peaks, or not chilling the final product long enough. The stiff peaks provide the structure for the entire dessert. Additionally, the full-fat cream cheese needs time to firm up in the cold. Do not shortcut the overnight chilling period!
Soggy Cake vs. Moist Cake: There is a fine line. We aim for moist cake. Do not soak the pound cake in liquid, as this turns it into mush. The light drizzle of cream/milk in Step 4, combined with the slow seepage of strawberry juice, provides the perfect moisture level over time.
Creative Variations of the Cheesecake Trifle
Gluten-Free and Low-Carb Options
- Gluten-Free Cake Base: Easily substitute the traditional pound cake with a store-bought gluten-free pound cake or use pre-made gluten-free ladyfingers, which offer a great sponge texture.
- Low-Carb Cheesecake: Substitute the powdered sugar in both the cream and the cheesecake filling with a erythritol-based powdered sweetener (like Swerve or Monk Fruit blend) that measures cup-for-cup. Skip the pound cake and use layers of chopped low-carb almond flour shortbread cookies instead.
Flavor Swaps and Additions
- Lemon Zest Brightness: Add the zest of one lemon to the cream cheese mixture for an intense, bright lemon-cheesecake flavor profile.
- Chocolate Chip Crunch: Fold mini chocolate chips into the cheesecake filling for a subtle crunch and complementary flavor.
- Different Fruit Combinations: Try using raspberries and blueberries for a triple berry Cheesecake Trifle, or swap the strawberries entirely for peaches or thinly sliced mango in the summer.
- Pudding Layer: If you prefer a richer, more traditional English custard element, you can swap one of the cheesecake layers for a thick, cold layer of homemade vanilla pudding. For another decadent dessert idea featuring similar layers, check out our recipe for easy chocolate pudding pie.
Enhancing the Cake Layer
Instead of plain pound cake, you could opt for:
- Angel Food Cake: Lighter and more airy, excellent for a less dense dessert.
- Ladyfingers (Savoiardi): Perfect for a tiramisu-like texture; they absorb the strawberry syrup beautifully.
- Shortbread Cookies: Crushed and buttered shortbread can be used as a crunchy base layer, mimicking a traditional cheesecake crust.
Serving Suggestions
Serve the Strawberry Cheesecake Trifle cold. Because of its height and complexity, scooping it out with a large serving spoon works best. Provide tall glasses or small bowls so guests can appreciate the layers they are about to devour. If you are serving a crowd, consider assembling the trifle in individual clear mason jars or dessert cups they are adorable, portable, and require zero scooping mess.
Nutritional Values and Ingredient Benefits of Strawberry Cheesecake Trifle
While the Strawberry Cheesecake Trifle is undoubtedly a decadent treat, understanding its nutritional components helps appreciate how this dessert fits into a balanced diet, particularly highlighting the benefits brought by the star ingredient: the fresh strawberries.
Approximate Nutritional Breakdown (Per Serving)
Note: Nutritional values vary widely based on the specific brand of pound cake, fat content of the dairy, and the size of the serving. This estimate is based on dividing a 12-cup trifle into 12 generous servings.
- Calories: 400–550 kcal
- Total Fat: 25–35g (High due to cream cheese and heavy cream)
- Saturated Fat: 15–20g
- Carbohydrates: 40–55g (Primarily from sugar in the cream/filling and the pound cake)
- Sugars: 30–45g
- Protein: 5–8g (From dairy components)
- Fiber: 2–3g (Primarily from strawberries)
The Health Benefits of Strawberries
The star of the Strawberry Cheesecake Trifle is not just a beautiful ingredient; it’s a powerhouse of nutrients:
- High in Vitamin C: Strawberries are an excellent source of Vitamin C, a powerful antioxidant that supports the immune system, promotes collagen production, and helps protect cells from damage.
- Antioxidant Rich: They contain a wealth of antioxidants, including ellagic acid and flavonoids, which are linked to reducing the risk of chronic diseases.
- Good Source of Manganese and Potassium: Manganese plays a role in metabolism, while potassium is essential for regulating blood pressure and fluid balance.
- Dietary Fiber: The fiber in strawberries aids in digestive health and helps promote feelings of fullness, balancing out the richness of the cheesecake component.
Dairy Benefits
The heavy whipping cream, cream cheese, and sour cream provide essential fats and proteins, along with crucial vitamins and minerals:
- Calcium and Vitamin D: Dairy is a fundamental source of calcium, vital for bone health, and often fortified with Vitamin D, which helps the body absorb calcium.
- Protein: The dairy base offers a good amount of protein, which is necessary for tissue repair and muscle maintenance.
While this Strawberry Cheesecake Trifle should certainly be enjoyed as a luxurious dessert, incorporating fresh, nutrient-dense strawberries ensures that your indulgence comes with a bonus boost of vital antioxidants and vitamins.
Frequently Asked Questions (FAQs) About Strawberry Cheesecake Trifle
How far in advance can I make a Strawberry Cheesecake Trifle?
The Strawberry Cheesecake Trifle is ideal for making ahead. You can fully assemble and refrigerate the dessert up to 24 hours before serving. This extended chilling time is beneficial, as it allows the pound cake to fully absorb the strawberry syrup and the cheesecake layers to set perfectly, resulting in better structure and flavor.
Can I use frozen strawberries instead of fresh ones?
While fresh strawberries are highly recommended for optimal flavor and texture, you can use frozen strawberries in a pinch. If using frozen, let them thaw completely and drain off any excess liquid before macerating them with the sugar and lemon juice. Be aware that frozen berries may become softer and lose some structural integrity once thawed.
What can I use instead of pound cake if I want a different flavor or texture?
The pound cake acts as a sturdy sponge, but you can successfully substitute it with other options. Great alternatives include angel food cake (for a lighter texture), vanilla sheet cake, or even crushed vanilla wafers or shortbread cookies for added crunch. Ensure the cake or cookie layers are dense enough to handle the moisture from the fruit and cream.
My cheesecake filling is too runny. What went wrong?
A runny filling usually occurs if the cream cheese was not beaten until smooth before adding other ingredients, or if the whipped cream was not whipped to stiff peaks. If the cream wasn’t stiff enough, it deflates easily when folded into the cream cheese. Ensure all dairy products are full-fat and give the trifle at least 8 hours in the refrigerator to allow the fats to firm up and solidify the filling.
How long will the Strawberry Cheesecake Trifle last in the refrigerator?
When properly stored (loosely covered to prevent condensation), this layered dessert will remain delicious for 3 to 4 days in the refrigerator. After the fourth day, the cake may start to become overly saturated and mushy, and the fresh strawberries will begin to lose their vibrant texture. It is best enjoyed within the first 48 hours.
Conclusion: Your New Go-To Dessert, the Magnificent Strawberry Cheesecake Trifle
The Strawberry Cheesecake Trifle stands as a testament to the idea that the most spectacular desserts are often the simplest to create. Combining the classic comfort of pound cake, the luscious tang of no-bake cheesecake, and the bright, sweet burst of perfectly macerated strawberries, this dessert delivers on all fronts: flavor, texture, and visual impact.
We’ve walked through the key steps from the crucial chilling of the whipping cream and the careful softening of the cream cheese, to the essential overnight rest that transforms individual layers into a cohesive, flavorful masterpiece. Remember that the mandatory chilling time is the single most important step in ensuring your trifle achieves that desired scoopable structure and deep, integrated flavor.
Whether you are hosting a formal dinner, celebrating a holiday, or simply craving a stunning dessert that captures the best of summer, this recipe for Strawberry Cheesecake Trifle is guaranteed to earn rave reviews. It is a foolproof recipe that allows even novice bakers to present a dessert that looks like it came straight from a gourmet bakery.
We encourage you to try this recipe, experiment with the variations (perhaps swapping in lemon curd or adding a layer of graham cracker crunch!), and share your magnificent creation with friends and family. Let us know in the comments below what fruit variations you tried and how your guests reacted to the elegant beauty of this layered dessert. Happy scooping!
No-Bake Strawberry Cheesecake Trifle
Ingredients
Equipment
Method
- In a medium bowl, combine the sliced strawberries, 1/2 cup of granulated sugar, and the lemon juice (if using). Gently toss until coated. Set aside at room temperature for 30 to 45 minutes to allow the berries to macerate and release their sweet juices.
- Pour the cold heavy whipping cream (3 cups) into a stand mixer bowl. Whip on medium speed until soft peaks form. Gradually add the 1/2 cup of additional powdered sugar and continue whipping until stiff peaks form. Reserve 1 1/2 cups of this whipped cream for the top layer and decoration.
- In a separate large bowl, beat the softened cream cheese until completely smooth. Add the 1 1/2 cups of sifted powdered sugar and vanilla extract, beating until light and airy. Mix in the sour cream until just combined.
- Take the remaining whipped cream (the amount not reserved for topping, approximately 1 1/2 cups) and gently fold it into the cream cheese mixture using a rubber spatula. This creates the light and airy no-bake cheesecake filling.
- Cut the thawed pound cake into 3/4-inch thick slices or cubes. Arrange the first half of the cake pieces in an even layer across the bottom of the clear glass trifle bowl. If desired, lightly drizzle this layer with 1-2 tablespoons of milk/cream or strawberry juice for extra moisture.
- Spread half of the prepared cheesecake filling evenly over the pound cake layer. Follow with half of the macerated strawberries, ensuring you spoon some of the syrup over the filling.
- Place the remaining pound cake slices or cubes over the strawberries. Spread the remaining cheesecake filling over the cake, followed by the rest of the strawberries and their juices.
- Top the trifle with the reserved 1 1/2 cups of whipped cream. Spread it smoothly or pipe it decoratively. Garnish the top with a few fresh strawberry slices or whole berries.
- Cover the trifle loosely and refrigerate for a minimum of 4 hours, but preferably 8 hours or overnight. This crucial chilling time allows the flavors to meld and the cake layers to soften. Serve chilled directly from the trifle bowl.