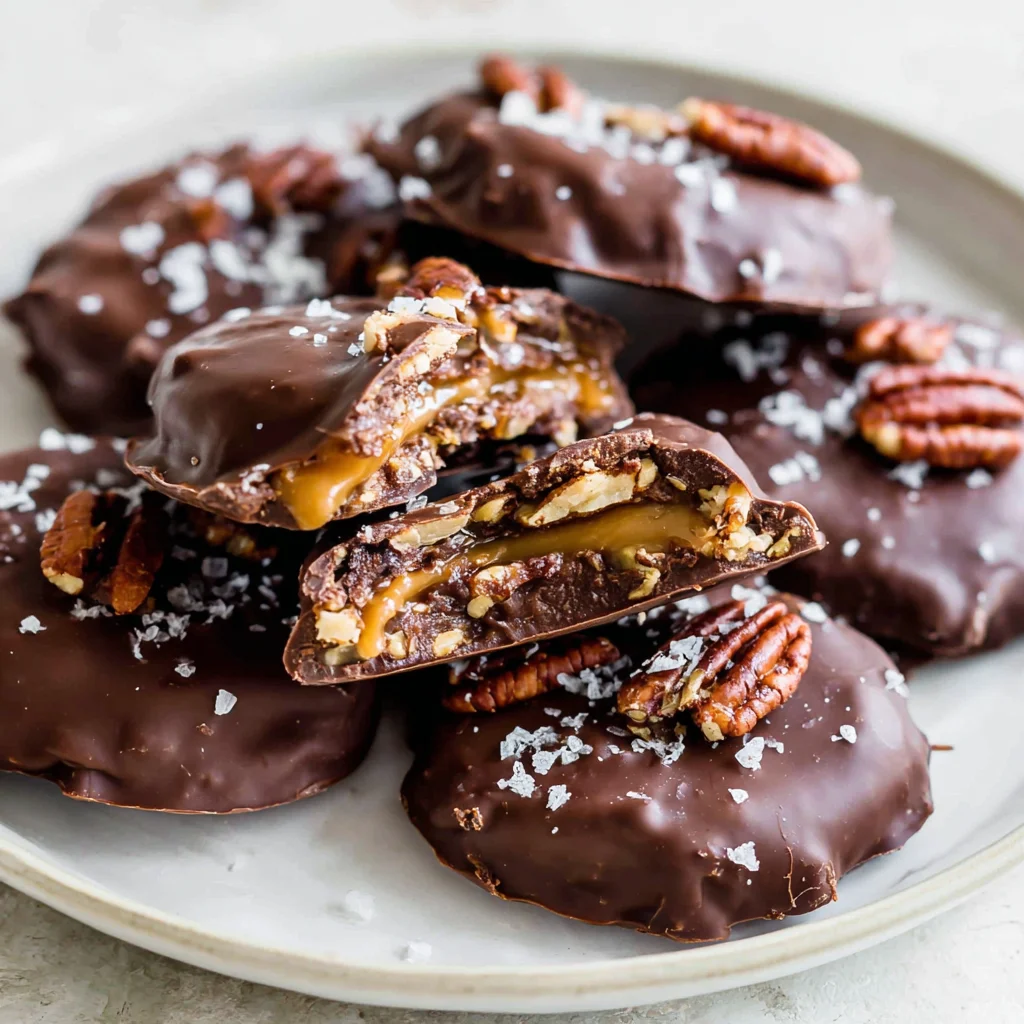
There are few candies that evoke the same comforting nostalgia and rich indulgence as the classic chocolate turtle. That perfect combination of crunchy, toasted pecans, gooey, chewy caramel, and a thick coating of luxurious melting chocolate is a true confectionery triumph. While store-bought versions are often good, nothing compares to the freshness, flavor, and texture of Homemade Chocolate Turtles. This recipe guides you through every crucial step from toasting the perfect pecan base to mastering the art of the soft-ball caramel ensuring a result so exquisite, you’ll never buy them again.
Making caramel candy from scratch might sound intimidating, but with a reliable recipe and the right tools (a candy thermometer is your best friend here!), you can achieve professional-level results right in your own kitchen. Whether you are preparing a special holiday gift basket, planning a sophisticated dessert tray, or simply craving an unparalleled chocolate indulgence, these Homemade Chocolate Turtles are guaranteed to be the star. Get ready to embark on a sweet adventure that yields a deeply satisfying and undeniably delicious treat.
Why You’ll Fall Head Over Heels for These Homemade Chocolate Turtles
The decision to make your own turtle candy goes far beyond saving a trip to the store; it’s about elevating the entire experience. When you create Homemade Chocolate Turtles, you control the quality, the depth of flavor, and the critical balance of ingredients that define this iconic confection. Here are several reasons why this specific recipe will become your go-to:
Unmatched Freshness and Flavor Intensity
The primary advantage of making turtle candy at home is the freshness. Pecans, when freshly toasted just minutes before assembly, possess a rich, earthy flavor and a vibrant crunch that pre-packaged nuts simply cannot replicate. Furthermore, our caramel recipe is designed to be deeply buttery and intensely rich. We utilize high-quality ingredients, including sweetened condensed milk and rich brown sugar, which results in a caramel that is supremely chewy yet perfectly soft, avoiding the brittle or overly sugary texture often found in mass-produced candies. This attention to fresh ingredients ensures that every bite of your Homemade Chocolate Turtles offers an explosion of nuanced flavor.
The Perfect Texture Trilogy: Crunch, Chew, and Snap
A great turtle candy relies on a triumvirate of textures. First, you have the satisfying crunch of the toasted pecans. Second, you achieve the delightful chewiness of the homemade caramel, set perfectly at 245°F (118°C) to prevent hardness. Finally, the outer layer provides the crisp, audible snap of high-quality chocolate. When these three elements converge, the resulting mouthfeel is complex and incredibly addictive. This recipe ensures the caramel achieves the “soft ball stage” consistency necessary for that signature, long-lasting chew.
Customization and Control Over Ingredients
When you craft these candies yourself, you dictate the experience. Are you a dark chocolate enthusiast? Use a high-cacao content melting wafer. Do you prefer the creaminess of milk chocolate? The choice is entirely yours. You also control the thickness of the chocolate coating and the amount of salt used in the caramel. This ability to tailor the sweetness and richness makes your Homemade Chocolate Turtles truly bespoke, catering exactly to your palate. This level of customization simply isn’t available when purchasing store-bought sweets.
Why Mastering the Art of DIY Turtle Candy is Worth the Effort
While this recipe requires patience and attention especially during the caramel-making phase the payoff is immense. Investing time in making Homemade Chocolate Turtles transforms a simple treat into a gourmet experience, making them perfect for gifting during the holidays or simply indulging on a quiet evening. This project is not just about the finished product; it’s about the joy of mastering a classic confectionery skill.
Superior Gifting Potential
Handmade gourmet treats like these Homemade Chocolate Turtles make impressive and heartfelt gifts. Packaged in a beautiful box or tin, they convey a level of effort and care that store-bought items simply cannot match. They are perfect for teacher gifts, hostess presents, or adding a personal touch to holiday cookie platters. Imagine the delight on someone’s face when they realize they are biting into scratch-made caramel candy! If you enjoy sharing high-quality, decadent holiday treats, you might also love making Chewy Pecan Pie Cookies, which share a similar indulgent nut and caramel profile.
Understanding Candy Chemistry
Following the caramel steps in this recipe offers a valuable lesson in candy chemistry. Working with a candy thermometer to achieve the exact temperature of 245°F (118°C) (the soft ball stage) is a fundamental skill in confectionery. This precision ensures your caramel is chewy, not sticky or rock-hard. Mastering this step gives you confidence for future candy-making endeavors, from fudges to toffees. It truly demystifies the process, turning what seems like magic into science.
A Cost-Effective Luxury
Gourmet chocolate turtles from specialty candy shops can be incredibly expensive. By purchasing high-quality ingredients in bulk, you can produce a large batch of Homemade Chocolate Turtles for a fraction of the cost per piece, without sacrificing flavor. This makes high-end indulgence accessible and sustainable for entertaining or large-batch gift preparation.
Gathering Your Supplies: Ingredients and Essential Tools for the Best Homemade Chocolate Turtles
Success in candy making hinges on accurate measurements and having the right equipment ready before you start cooking the caramel. Ensure all your ingredients are measured precisely and your work station is prepped. We need both wet ingredients for the caramel and dry ingredients, plus our chocolate coating.
Detailed Ingredients List
The quality of these candies rests heavily on the core ingredients. Opt for high-quality butter and chocolate for the most luxurious result.
For the Caramel Center: The Heart of the Turtle
- 1 cup (2 sticks) unsalted butter: Use unsalted butter to control the overall saltiness. Butter provides the necessary richness and fat content, contributing significantly to the caramel’s smooth texture and deep flavor.
- 1 cup packed light brown sugar: Brown sugar adds depth and molasses flavor, which is crucial for authentic, buttery turtle caramel. Ensure it is packed firmly when measuring.
- ½ cup light corn syrup: This ingredient is non-negotiable for smooth caramel candy. It acts as an invert sugar, preventing the sugar molecules from crystallizing and becoming grainy. It ensures a glossy, soft, and stable chew.
- 1 (14 ounce) can sweetened condensed milk: This provides body, creaminess, and additional sweetness. Do not substitute this with evaporated milk; they are fundamentally different products.
- 1 teaspoon vanilla extract: Added at the end to enhance the flavor profile. The heat is removed before adding the vanilla to preserve its delicate aroma.
- ½ teaspoon salt: Essential for balancing the intense sweetness of the caramel, creating that desirable sweet-and-salty flavor contrast.
For the Turtles Assembly: Crunch and Coating
- 2 cups whole pecan halves (approximately 48 to 60 halves): Pecans are the classic choice, providing the crunchy, “feet” base of the turtle shape. Ensure they are whole halves for the best presentation. Toasting them first is vital for flavor.
- 2 pounds high-quality chocolate for melting (milk, semi-sweet, or dark chocolate melting wafers or bars): Quality matters here. We strongly recommend using couverture chocolate or specific melting wafers (like Ghirardelli or Callebaut) as they contain higher cocoa butter content, ensuring a smoother melt and a glossy, professional-looking finish without complex tempering.
- 2 teaspoons shortening or coconut oil (optional, for thinning chocolate): Adding a small amount of fat helps make the melted chocolate slightly runnier, facilitating easier dipping and creating a thinner, glossier coating.
Essential Kitchen Tools for Perfect Candy Making
The right equipment ensures accuracy and safety, especially when dealing with hot sugar mixtures. Do not skip the candy thermometer!
Mandatory Tools: Precision is Key
- Heavy-Bottomed Saucepan (3-4 quart): A heavy bottom ensures even heat distribution, preventing the caramel from scorching on the bottom while the top is still cool.
- Candy Thermometer: Absolutely essential for achieving the correct texture. The caramel must reach 245°F (118°C) precisely for the soft ball stage. Digital thermometers are often easier to read than traditional glass thermometers.
- Parchment Paper or Silicone Mats: Crucial for lining the baking sheets. Hot caramel adheres permanently to bare metal, making removal impossible. Silicone mats offer the best non-stick release.
- Sturdy Wooden Spoon or Heat-Resistant Spatula: Necessary for constant stirring during the caramel-cooking phase.
Helpful Tools: For Assembly and Dipping
- Two Large Baking Sheets: Needed for both toasting the pecans and setting the finished turtles.
- Microwave-Safe Bowl or Double Boiler: For melting the chocolate.
- Forks or Dipping Tools: Specialized dipping forks can make coating the turtles much easier and neater.
- Measuring Cups and Spoons: Accuracy in measuring sugar and syrups is critical for candy success.
Step-by-Step Guide to Crafting Perfect Homemade Chocolate Turtles
This recipe is broken down into four distinct phases. Follow these steps methodically, paying close attention to temperature, to achieve beautifully structured and delicious Homemade Chocolate Turtles.
Phase 1: Preparation and Pecan Assembly
Preparation is the foundation of success in candy making. Have everything lined, toasted, and arranged before the caramel even hits the heat.
- Line and Preheat: Line two large baking sheets with parchment paper or silicone mats. Preheat your oven to 350°F (175°C).
- Toast the Pecans: Spread the 2 cups of pecan halves in a single layer on a baking sheet. Toast them for 5 to 7 minutes. Crucial Tip: Pecans burn quickly! They are done when they are fragrant. Remove them immediately and allow them to cool completely. Warm nuts can melt the caramel prematurely.
- Arrange the Bases: Once cooled, arrange the pecan halves onto the prepared, lined baking sheets. Create small clusters of three or four nuts, positioned tightly together to form the base of your turtle. Leave adequate space (about 2 inches) between each cluster to allow the caramel to pool neatly.
Phase 2: Cooking the Homemade Caramel
This phase is the most critical and requires your full attention and a candy thermometer.
- Combine Ingredients: In a heavy-bottomed saucepan, combine the butter, brown sugar, corn syrup, and sweetened condensed milk.
- Melt and Dissolve: Place the saucepan over medium heat. Stir the mixture constantly until the butter has fully melted and the sugar has completely dissolved. The mixture should look uniform and slightly glossy.
- Attach Thermometer and Boil: Attach a candy thermometer to the side of the pan, ensuring the tip is submerged but does not touch the bottom. Bring the mixture to a slow, rolling boil.
- Reach Soft Ball Stage: Continue to cook the caramel, stirring frequently (but gently) to prevent scorching on the bottom. Cook until the temperature reaches exactly 245°F (118°C). This temperature corresponds to the soft-ball stage and ensures the caramel will be perfectly chewy when cooled. This typically takes 15 to 20 minutes of simmering.
- Finish the Caramel: Remove the saucepan immediately from the heat once 245°F is reached. Quickly stir in the vanilla extract and salt until fully incorporated.
Phase 3: Assembling the Caramel Centers
You must work quickly during this phase before the caramel cools and hardens.
- Spoon the Caramel: Working swiftly while the caramel is hot, use a clean metal spoon to drop a heaping teaspoon of the caramel mixture directly over the center of each pecan cluster. The caramel should gently flow and cover the middle of the nuts, holding the cluster together. Resist the urge to use too much caramel, which can make dipping difficult later.
- Allow to Set: Allow the assembled pecan and caramel clusters to cool and set completely. This process can take several hours at room temperature, or you can accelerate it by transferring the baking sheets to the refrigerator for approximately 30 to 45 minutes. The caramel must be firm to the touch before moving to the chocolate phase.
Phase 4: Coating with Chocolate (The Finish Line)
The final layer gives the Homemade Chocolate Turtles their distinct look and luxurious snap. For a similar easy-to-make chocolate treat, check out our guide on Easy Chocolate Fudge.
- Melt the Chocolate: If using chocolate bars, chop them uniformly. Place the chocolate in a microwave-safe bowl. Microwave in 30-second intervals, stirring thoroughly after each interval, until the chocolate is completely smooth and melted. Stir in the optional shortening or coconut oil now if desired, to achieve a thinner consistency.
- Dip or Drizzle: Carefully lift one set caramel turtle off the parchment paper. You have two main methods:
- Dipping (Thicker Coating): Dip the entire bottom and sides of the turtle into the melted chocolate, leaving the very tops of the pecans exposed for decoration.
- Drizzling (Easier): Place the turtle on a fork and use a spoon to drizzle the melted chocolate over the entire surface, ensuring the caramel is fully encased.
- Set the Coating: Return the coated turtle to a clean, parchment-lined baking sheet. Repeat this process for all remaining turtles, allowing any excess chocolate to drip off before setting the candy down.
- Final Set: Allow the finished chocolate turtles to set completely. This can be done at cool room temperature for 1-2 hours or by chilling them in the refrigerator for 20 minutes. Once the chocolate shell is firm and glossy, they are ready to serve and store.
Tips, Tricks, and Decadent Variations for Your Turtle Candy
Achieving the perfect caramel can be tricky, but knowing common pitfalls and creative variations can guarantee success and keep your candy selection exciting.
Avoiding Common Caramel Catastrophes
The biggest challenge in making Homemade Chocolate Turtles is ensuring the caramel sets correctly it should be chewy, not gritty or rock-hard.
- The Gritty Problem (Crystallization): Sugar crystals that stick to the side of the pot can fall back into the boiling mixture, causing the entire batch to crystallize (become grainy). Tip: Once the mixture starts boiling, stop stirring. If you see crystals forming on the sides, use a pastry brush dipped in water to wash them back down into the mix.
- The Hard Caramel Problem: If your caramel is too hard, it was cooked too long or reached too high a temperature (above 248°F). Tip: Always use a reliable thermometer and remove the pot immediately when it hits 245°F.
- The Too Soft Caramel Problem: If your caramel is gooey and fails to hold its shape after chilling, it didn’t reach 245°F. Tip: Reheat the caramel mixture slowly, stirring gently, until it hits the target temperature.
- Preventing Scorching: Always use a heavy-bottomed pot and keep the heat moderate. Consistent, gentle stirring before boiling begins is essential.
Delicious Turtle Variations and Substitutions
You can easily adapt this base recipe for Homemade Chocolate Turtles to suit dietary needs or flavor preferences.
Flavor and Texture Variations:
- Salted Caramel Turtles: After the chocolate coating has slightly set, sprinkle the top of each turtle with a few flakes of coarse sea salt (like Maldon). This accentuates the sweet-and-salty profile.
- Nut Substitutions: While pecans are traditional, you can substitute other nuts like whole toasted almonds, cashews, or even macadamia nuts for a different textural experience.
- Chocolate Blend: Try using a combination of chocolates dip in semi-sweet, then drizzle with white chocolate for visual appeal.
Dietary Alternatives:
- Gluten-Free: The recipe is naturally gluten-free! Ensure your chocolate brand doesn’t contain cross-contamination if severe allergies are a concern.
- Dairy-Free/Vegan Turtles: Achieving the rich texture requires careful substitution. Replace unsalted butter with high-quality vegan butter sticks. Substitute sweetened condensed milk with a can of sweetened condensed coconut milk (widely available now). The resulting caramel may be slightly softer, so consider cooking it to 248°F (120°C) to ensure a firm set.
For more indulgent pecan and caramel recipes that make excellent additions to a festive spread, be sure to check out my collection of holiday baking ideas on Pinterest, where you’ll find similar delights like Crumbl Pecan Pie Cookies.
Decadence and Delight: Nutritional Information and Ingredient Benefits
While Homemade Chocolate Turtles are undeniably an indulgent treat, they also contain high-quality ingredients that offer certain benefits, particularly the pecans and high-cacao chocolate.
A Note on Nutritional Values
Please note that precise nutritional values depend heavily on the size of the turtle, the ratio of caramel to chocolate, and the type of chocolate used (milk vs. dark). As a high-fat, high-sugar confection, these should be enjoyed in moderation. The values below are generalized estimates for a standard-sized homemade turtle:
| Nutritional Component (Estimated Per Turtle) | Value |
|---|---|
| Calories | 180 – 220 kcal |
| Total Fat | 15 – 18 g |
| Saturated Fat | 8 – 10 g |
| Cholesterol | 10 – 15 mg |
| Sodium | 30 – 50 mg |
| Total Carbohydrates | 15 – 20 g |
| Dietary Fiber | 1 – 2 g |
| Sugars | 12 – 16 g |
| Protein | 2 – 3 g |
Benefits of Key Ingredients
Pecans: Healthy Fats and Antioxidants
Pecans are more than just a crunchy base; they are nutritional powerhouses. They are rich in healthy monounsaturated fats (like oleic acid), which are beneficial for heart health. They are also packed with antioxidants, particularly Vitamin E, which helps protect cells from damage. Furthermore, pecans offer a good source of fiber, manganese, and copper.
High-Quality Dark Chocolate: Flavonoids
If you choose to use dark chocolate (70% cocoa or higher) for your Homemade Chocolate Turtles, you benefit from cocoa’s natural properties. Cocoa is known to contain flavonoids, which have been linked to improved blood flow and reduced risk of heart disease. Dark chocolate also contains minerals like iron, magnesium, and zinc. Using high-quality chocolate not only enhances the flavor but provides these subtle nutritional boosts.
Dairy and Energy Content
The butter and sweetened condensed milk provide calcium and Vitamin A, though their main contribution here is energy and richness. The combination of fats, sugars, and protein provides a quick source of energy, making these turtles an ideal afternoon treat or post-dinner indulgence. Remember, the intensity of flavor allows for enjoyment in smaller portions.
Frequently Asked Questions (FAQ) about DIY Chocolate Turtles
Here are some of the most common questions people ask when making their own Homemade Chocolate Turtles at home.
What is the best temperature for caramel in Homemade Chocolate Turtles?
The ideal temperature for the caramel center is 245°F (118°C), which corresponds to the soft ball stage in candy making. Hitting this temperature ensures the caramel is chewy and firm enough to hold its shape once cooled, but not brittle or hard like toffee. Using a reliable candy thermometer is critical to achieving this precise result.
Why is my homemade turtle caramel grainy?
Grainy caramel usually results from crystallization. This occurs when sugar crystals adhere to the sides of the pan and fall back into the boiling mixture, causing a chain reaction. To prevent this, avoid stirring the caramel after it begins to boil, and use corn syrup (as listed in this recipe) to stabilize the sugar mixture. If crystals form, gently wash them down with a wet pastry brush.
Can I use chocolate chips instead of melting wafers for coating Homemade Chocolate Turtles?
While you can melt chocolate chips, they often contain stabilizers that prevent them from melting as smoothly as dedicated melting wafers (couverture chocolate). Using chips may result in a dull finish and a softer “snap.” For the best texture, gloss, and stability, high-quality melting wafers or chocolate bars are strongly recommended for coating your Homemade Chocolate Turtles.
How long do Homemade Chocolate Turtles last?
When stored correctly in an airtight container at cool room temperature (below 70°F), Homemade Chocolate Turtles will maintain their quality for up to 2-3 weeks. If you need to store them longer, they can be refrigerated for up to a month, though chilling may slightly dull the chocolate’s shine. Always ensure they are protected from humidity.
Is it necessary to toast the pecans before assembly?
Yes, toasting the pecans is a vital step that significantly enhances the flavor of the final candy. Toasting brings out the natural oils in the nuts, resulting in a deeper, nuttier flavor and a superior crunch. Untoasted pecans often taste bland and detract from the richness of the caramel and chocolate.
Can I freeze Homemade Chocolate Turtles?
Yes, you can freeze them! Place the completely set turtles in a single layer in an airtight container, separated by parchment paper. They can be frozen for up to three months. To thaw, move the container to the refrigerator overnight, then let them come to room temperature before serving to prevent condensation from affecting the chocolate coating.
Conclusion: The Sweet Reward of Homemade Confectionery
Creating your own Homemade Chocolate Turtles is truly a rewarding culinary endeavor. While it requires precision and a commitment to the candy thermometer, the resulting confection is light years ahead of any store-bought alternative. You achieve a richness in the buttery caramel, a satisfying crunch from the freshly toasted pecans, and a perfect snap from the high-quality chocolate that only a scratch-made recipe can deliver.
These decadent treats are ideal for celebrating special occasions, providing a luxurious dessert, or simply proving to yourself that gourmet candy making is well within your reach. Remember the key takeaways: toast the nuts for maximum flavor, hit exactly 245°F for the perfect chew, and use quality chocolate for a professional finish.
We hope this detailed guide empowers you to tackle this classic recipe with confidence. Once you taste the difference that truly Homemade Chocolate Turtles make, you’ll never look back. Give this recipe a try, share your creations with friends and family, and let us know in the comments how your candy-making journey went!
Homemade Chocolate Turtles with Buttery Caramel
Ingredients
Equipment
Method
- Line two large baking sheets with parchment paper or silicone mats. Preheat your oven to 350°F (175°C). Spread the pecan halves in a single layer on a baking sheet and toast them for 5 to 7 minutes until fragrant. Watch closely to prevent burning. Remove the nuts and allow them to cool completely.
- Once cooled, arrange the pecan halves onto the prepared baking sheets in clusters of three or four nuts, positioned close together to form a small base for the turtle shape. Ensure you leave adequate space between each cluster.
- In a heavy-bottomed saucepan, combine the butter, brown sugar, corn syrup, and sweetened condensed milk. Place the saucepan over medium heat. Stir constantly until the butter has fully melted and the sugar has completely dissolved.
- Attach a candy thermometer to the side of the pan (ensuring the tip does not touch the bottom). Bring the mixture to a slow, rolling boil. Continue to cook the caramel, stirring frequently to prevent scorching, until it reaches a temperature of 245°F (118°C).
- Remove the saucepan immediately from the heat once the desired temperature is reached. Quickly stir in the vanilla extract and salt until they are fully incorporated.
- Working quickly while the caramel is still hot, spoon a heaping teaspoon of the caramel mixture directly over the center of each pecan cluster. The caramel should gently pool over the nuts, covering the center completely.
- Allow the assembled pecan and caramel clusters to cool and set completely at room temperature for several hours, or transfer the baking sheets to the refrigerator for approximately 30 to 45 minutes to speed up the setting process. The caramel must be firm before proceeding.
- Chop the melting chocolate (if not using wafers). Place the chocolate in a microwave-safe bowl. Microwave in 30-second intervals, stirring thoroughly after each interval, until the chocolate is smooth and completely melted. If using shortening or coconut oil, stir it in now to thin the chocolate slightly.
- Carefully lift one set caramel turtle off the parchment paper. Dip the bottom of the turtle into the melted chocolate, coating the caramel and pecans fully. Alternatively, place the turtle on a fork and use a spoon to drizzle the chocolate over the entire surface.
- Return the coated turtle to the clean, parchment-lined baking sheet. Repeat this process for all remaining turtles, allowing the excess chocolate to drip off before setting the candies down.
- Allow the finished chocolate turtles to set completely at room temperature for several hours, or chill them in the refrigerator for 20 minutes until the chocolate shell is firm and glossy.