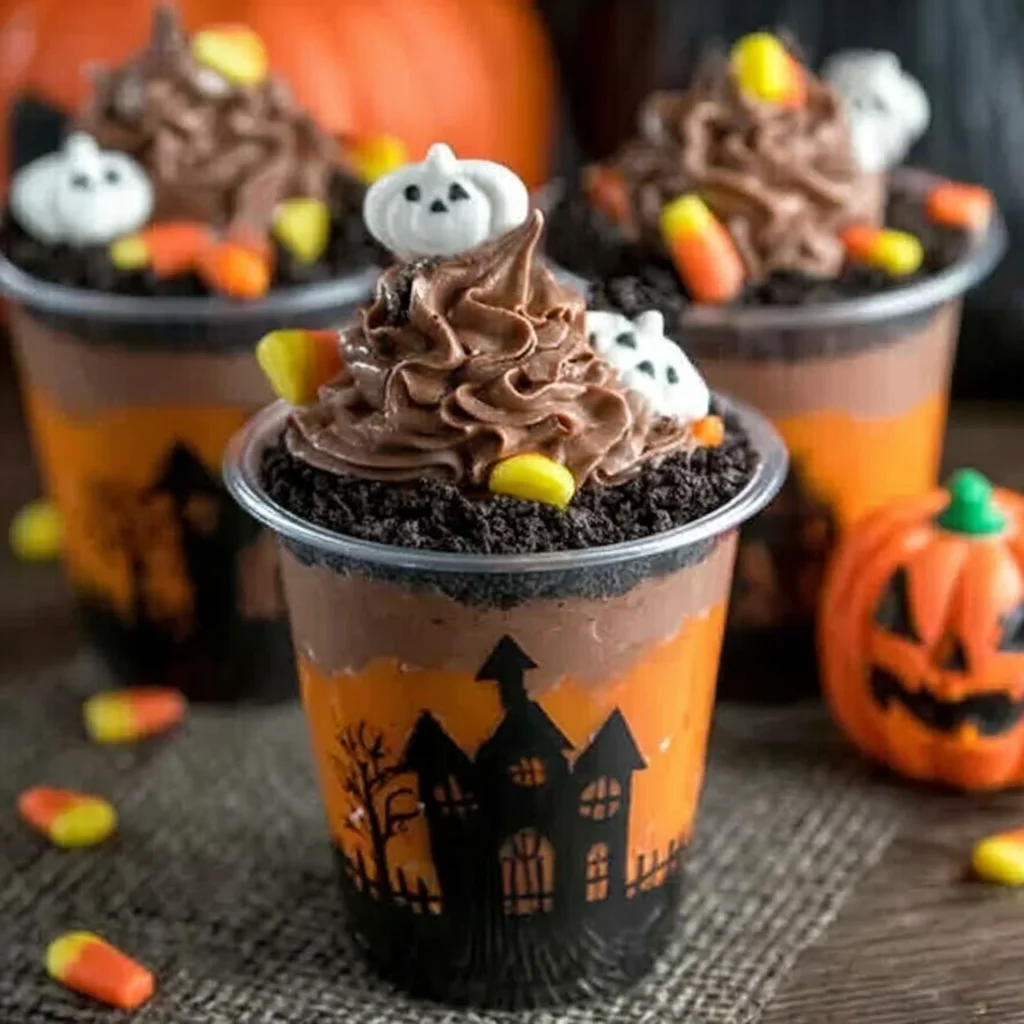
Get ready to dig into some deliciousness this Halloween with these easy-to-make Halloween Dirt Cups! These spooky treats are perfect for Halloween parties, classroom celebrations, or a fun family dessert night. Imagine the delight on your guests’ faces as they unearth gummy worms and plastic spiders hidden beneath layers of chocolatey goodness. These aren’t your average dirt cups; they’re a delightfully creepy creation that’s as fun to make as it is to eat. Forget those store-bought, mass-produced sweets – this recipe allows you to create a personalized, uniquely delicious dessert experience, perfectly tailored to your Halloween festivities. We’re diving deep into the creation of these frightfully fun Halloween Dirt Cups, providing you with a step-by-step guide, variations, and tips to ensure your Halloween dessert is a resounding success. Prepare for a deliciously spooky adventure!
Why You’ll Love This Halloween Dirt Cups Recipe
This Halloween Dirt Cups recipe is a winner for several reasons. Firstly, it’s incredibly easy to make! Even the most novice baker can whip up a batch of these delectable treats in a flash. No complex techniques or specialized equipment are needed – just a few simple ingredients and some basic mixing. This simplicity makes it perfect for busy Halloween schedules, allowing you more time to focus on other festive preparations. Secondly, it’s incredibly customizable. Want to add a dash of peanut butter? Go for it! Prefer different gummy candies? Absolutely! The flexibility of this recipe allows you to personalize it to suit your tastes and dietary needs. Consider adding other spooky candies like chocolate coins, eyeballs, or even mini marshmallows for a whimsical twist. The beauty of this recipe is in its adaptability; let your creativity run wild!
Thirdly, and perhaps most importantly, these Halloween Dirt Cups are incredibly delicious! The combination of crunchy chocolate cookie crumbs, creamy cream cheese frosting, and rich chocolate pudding creates a symphony of flavors and textures that will tantalize your taste buds. The gummy worms and plastic spiders add a playful, spooky touch that elevates the entire experience, making it a truly unforgettable Halloween treat. Plus, they’re visually appealing! The layered effect creates a stunning dessert that’s as pleasing to the eye as it is to the palate. It’s the perfect way to impress your guests and add a touch of Halloween magic to your celebrations. Whether you’re hosting a large party or just treating your family, these Halloween Dirt Cups are sure to be a huge hit! Check out our other dessert recipes like the Easy Peanut Butter Pie for more spooky fun.
Why You Should Try This Halloween Dirt Cups Recipe
Beyond the ease and deliciousness, this Halloween Dirt Cups recipe offers several compelling reasons to give it a try. It’s perfect for all ages. Kids will especially love the fun, spooky elements, while adults will appreciate the rich, satisfying flavors. It’s a great way to get kids involved in the Halloween baking process. Let them help crush the cookies, layer the ingredients, or decorate the cups – it’s a fantastic opportunity for some quality family time and creating lasting Halloween memories. This hands-on approach makes the experience even more enjoyable, transforming the task of making dessert into a fun family activity. This is a recipe that’s perfect for all skill levels, from beginners to seasoned bakers. The simple steps make it easy to follow, and the forgiving nature of the recipe allows for some creative improvisation.
Furthermore, these Halloween Dirt Cups are incredibly cost-effective. The ingredients are readily available and relatively inexpensive, making this a budget-friendly option for your Halloween festivities. You can easily adjust the recipe to serve a larger or smaller crowd, making it a versatile choice for any gathering, large or small. Moreover, these treats are naturally portioned, eliminating the need for slicing or serving, and making it a stress-free option for party hosting. Lastly, they are incredibly versatile, easily adaptable for different dietary needs and preferences. Want a vegan version? Try vegan chocolate cookies and a plant-based cream cheese. Need gluten-free? Opt for gluten-free chocolate sandwich cookies. The possibilities are endless, making this recipe truly inclusive for everyone to enjoy. For more delicious and easy recipes, head over to our website Recipes Luna.
Ingredients and Necessary Utensils for Halloween Dirt Cups
Gathering the right ingredients and utensils is crucial for a successful Halloween Dirt Cups baking experience. Here’s a detailed breakdown to ensure you have everything you need:
Ingredients:
- 1 package (16 ounces) chocolate sandwich cookies: These form the base “dirt” of your cups. Choose your favorite brand; the richer the chocolate, the better! Consider using gluten-free options if needed.
- 1/2 cup (1 stick) unsalted butter, melted: The melted butter acts as a binder for the cookie crumbs, creating a moist, crumbly texture. You can use salted butter, but reduce the added salt later.
- 1 (8 ounce) package cream cheese, softened: Softened cream cheese is essential for a smooth, creamy frosting. Ensure your cream cheese is at room temperature for easy mixing.
- 1/2 cup powdered sugar: This sweetens the cream cheese frosting and adds a subtle sweetness to the overall flavor profile. You can adjust this to your sweetness preference.
- 1 teaspoon vanilla extract: Vanilla extract enhances the flavor of the cream cheese frosting and adds a touch of warmth. Consider using other extracts like almond or peppermint for variation.
- 1 cup chocolate pudding (instant or prepared): This provides a rich, chocolatey layer to contrast the creamy frosting and crunchy base. Choose your preferred type – instant mixes are convenient, while prepared pudding offers a richer texture.
- Gummy worms: These are essential for the “wormy” effect, adding a fun, spooky element to the finished product. Choose your favorite color and size.
- Plastic spiders (optional): These optional additions take the spooky factor to the next level, bringing an element of playful fright to your dessert.
- Chocolate shavings (optional): Optional chocolate shavings add a visual appeal and enhance the chocolate flavor profile. You can use a vegetable peeler or a chocolate grater for making the shavings.
Utensils:
- Food processor or zip-top bag: For crushing the chocolate sandwich cookies efficiently.
- Mixing bowls: At least two bowls are needed – one for crushing the cookies and another for mixing the frosting.
- Spatula or whisk: For blending the frosting ingredients smoothly and thoroughly.
- Measuring cups and spoons: For precise measurement of ingredients. Accuracy is key to achieving the perfect balance of flavors and textures.
- Serving cups or glasses: These will hold your Halloween Dirt Cups. Choose clear cups or glasses to showcase the layered effect of the dessert. Small plastic cups are ideal for party settings.
- Spoon: For layering the ingredients in the cups neatly. A small spoon helps for detailed layers.
Detailed Recipe Steps for Halloween Dirt Cups
Follow these step-by-step instructions for creating deliciously spooky Halloween Dirt Cups:
- Crush the cookies: Place the chocolate sandwich cookies in a food processor and pulse until finely crushed. Alternatively, place the cookies in a sturdy zip-top bag and crush them using a rolling pin. Aim for a relatively fine crumb consistency, resembling dirt.
- Combine cookie crumbs and butter: In a mixing bowl, combine the crushed cookies and melted butter. Mix well until all the crumbs are evenly moistened. **Ensure the butter is completely melted for even distribution.**
- Prepare the cream cheese frosting: In a separate mixing bowl, beat the softened cream cheese, powdered sugar, and vanilla extract until light, fluffy, and smooth. **Make sure the cream cheese is softened to room temperature for optimal mixing.** A stand mixer or hand mixer can assist in this process.
- Layer the ingredients: Divide the cookie crumb mixture among your serving cups or glasses. Press down gently to create a firm base layer. Next, add a layer of chocolate pudding followed by a layer of cream cheese frosting. Repeat this layering process, ending with a layer of the cookie crumb mixture.
- Decorate: Top each Halloween Dirt Cup with gummy worms and plastic spiders. Add chocolate shavings for an extra touch of elegance. Feel free to use your creativity to add any extra spooky embellishments!
- Chill (optional): For a firmer, colder treat, refrigerate the Halloween Dirt Cups for at least 30 minutes before serving. This allows the layers to set, providing a more defined texture.
Tips and Variations for Halloween Dirt Cups
Here are some tips and variations to elevate your Halloween Dirt Cups:
- Ingredient Alternatives: For a vegan version, use vegan chocolate sandwich cookies, vegan cream cheese, and your favorite vegan chocolate pudding. For a gluten-free version, substitute gluten-free chocolate sandwich cookies.
- Flavor Variations: Experiment with different pudding flavors like peanut butter or caramel. You could also add a sprinkle of cinnamon or cocoa powder to the cookie crumbs for extra flavor.
- Presentation: Arrange the Halloween Dirt Cups on a platter with a Halloween-themed tablecloth and spooky decorations for a truly immersive dessert experience. Consider adding dry ice (with caution and proper ventilation) for a theatrical smoky effect.
- Avoid Common Mistakes: Don’t over-crush the cookies; you want some texture remaining. Ensure the butter is fully melted before mixing with the cookies for even distribution. Don’t over-mix the cream cheese frosting; a smooth, but not overly whipped, texture is ideal.
- Make Ahead: You can prepare the cookie crumb mixture and the cream cheese frosting a day in advance. Store them separately in the refrigerator and assemble the Dirt Cups just before serving.
Nutritional Values and Benefits of Halloween Dirt Cups
While Halloween Dirt Cups are a treat, understanding their nutritional profile and the benefits of their ingredients is helpful. Note that nutritional information varies depending on the specific brands and ingredients used. This is an approximate estimation based on common brands:
Approximate Nutritional Information (per serving, assuming 6 servings):
- Calories: Approximately 300-350
- Protein: Approximately 3-5 grams
- Fat: Approximately 15-20 grams
- Carbohydrates: Approximately 40-45 grams
Benefits of Ingredients:
- Chocolate: Contains antioxidants and can boost mood (in moderation).
- Cream Cheese: Source of calcium and protein.
- Cookies: Provide carbohydrates for energy.
Important Note: This is a treat and should be consumed in moderation as part of a balanced diet. Adjust ingredients according to your dietary needs and preferences.
FAQs
How long do Halloween Dirt Cups last?
Can I make Halloween Dirt Cups ahead of time?
What are some creative variations for Halloween Dirt Cups?
Are these Halloween Dirt Cups gluten-free or vegan adaptable?
How can I make my Halloween Dirt Cups extra spooky?
Conclusion: Embrace the Spooky Fun of Halloween Dirt Cups!
These Halloween Dirt Cups are more than just a dessert; they’re a fun, easy, and delicious way to celebrate the spooky season. The combination of crunchy, creamy, and chocolatey textures, coupled with the playful spooky decorations, creates a truly unforgettable treat for Halloween parties, family gatherings, or even a simple night in. With minimal effort and readily available ingredients, you can create a dessert that’s both visually appealing and delightfully tasty. Remember to share your creations with us! Post pictures of your Halloween Dirt Cups on social media and tag us – we’d love to see your spooky masterpieces! Don’t forget to check out more delicious recipes on our website Recipes Luna and for more dessert ideas, explore our Pinterest board! Happy haunting, and happy baking!
Spooky Halloween Dirt Cups
Ingredients
Equipment
Method
- Crush chocolate sandwich cookies into fine crumbs using a food processor or zip-top bag and rolling pin.
- In a medium bowl, combine the cookie crumbs and melted butter. Mix well to combine.
- In a separate bowl, beat together the softened cream cheese, powdered sugar, and vanilla extract until smooth and creamy.
- Layer the cookie crumb mixture into small cups or glasses, pressing down gently to create a 'dirt' base.
- Spoon the chocolate pudding over the cookie crumb layer.
- Top with the cream cheese mixture, spreading it evenly.
- Decorate with gummy worms, plastic spiders, and chocolate shavings (optional).
- Refrigerate for at least 30 minutes before serving to allow the flavors to meld and the dessert to set.