If there is one appetizer guaranteed to steal the show at any gathering be it a holiday party, a casual weekend tailgate, or a simple movie night it’s the classic cheese ball. But we aren’t talking about your grandmother’s pedestrian pineapple and walnut rendition. We are elevating this party staple into something spicy, savory, and irresistibly creamy: the Jalapeño Popper Cheese Ball. This recipe takes all the beloved flavors of a deep-fried jalapeño popper the creaminess, the cheddar sharpness, the smoky bacon, and that signature kick and transforms them into a massive, gorgeous, and easily shareable spread. Forget fiddling with deep fryers and messy assembly; this long and easy recipe simplifies appetizer creation without sacrificing flavor or impact.
The beauty of the Jalapeño Popper Cheese Ball lies in its make-ahead simplicity. You invest twenty quick minutes of mixing, and the refrigerator does all the heavy lifting, allowing the flavors to meld perfectly before the grand debut. Coated in a crunchy, toasted panko and fresh chive crust, this appetizer offers textural complexity alongside its intense, savory heat. Whether you serve it with hearty crackers, crusty bread, or fresh veggies, preparing this Jalapeño Popper Cheese Ball is the easiest way to become the party MVP. Let’s dive into creating this masterpiece that brings the heat in the most delicious way possible.
Recipe Overview and Essential Details
- Yield: 1 Large Cheese Ball (feeds 10–15 guests)
- Prep Time: 20 Minutes
- Chill Time: 2 Hours Minimum (crucial for texture)
Why You’ll Love This Homemade Jalapeño Popper Cheese Ball Recipe
This isn’t just another dip; this is a culinary experience wrapped up in a sphere of creamy, savory delight. The reason the Jalapeño Popper Cheese Ball has gained such rapid popularity among hosts and home chefs is multifaceted. It perfectly balances opposing flavors and textures, creating a bite that is simultaneously cooling, fiery, crunchy, and smooth.
The Perfect Flavor Fusion: Spicy, Savory, and Smokey
The core genius of the jalapeño popper is the juxtaposition of heat against dairy, and this cheese ball executes that perfectly. We start with a foundation of two types of cheese softened cream cheese for luxurious creaminess and sharp cheddar for a tangy, robust flavor profile. Grated Parmesan adds a necessary nutty, salty depth that elevates the base far beyond simple cream cheese. But what truly makes this a popper experience is the inclusion of finely diced, canned jalapeños. Using canned or jarred jalapeños ensures reliable heat levels and saves significant preparation time, unlike working with fresh peppers, which require seeding and blanching to manage their fierce potency.
Furthermore, the smoky, salty addition of crispy bacon crumbles threads throughout the mixture, offering pockets of concentrated flavor and savory crunch. We don’t skimp on the seasonings either; a simple blend of garlic and onion powder ensures this cheese ball isn’t bland it’s layered with aromatic complexity that makes every bite addictive. When you introduce this Jalapeño Popper Cheese Ball to your guests, expect rave reviews about the complexity of flavors achieved with such simple ingredients.
Make-Ahead Marvel: Effortless Entertaining
Hosting can be stressful, but appetizers shouldn’t be. This recipe is the ultimate solution for stress-free entertaining because it requires significant chilling time. You can (and should!) make the entire mixture, shape it, and wrap it tightly 1 to 2 days before your event. This dedicated chilling period isn’t just for firmness it’s where the magic happens, allowing the jalapeño and bacon flavors to fully infuse the cheese base. When party time arrives, all that’s left is the quick step of rolling the perfectly firmed sphere in its crunchy coating and presenting it for serving. This characteristic makes the Jalapeño Popper Cheese Ball an essential item for holiday planning or game-day preparations, freeing you up to focus on main courses or festive sides.
Unbeatable Texture Contrast
A mediocre cheese ball is soft all the way through, leading to cracker collapse and a monotonous eating experience. Not here. We utilize toasted panko breadcrumbs for the exterior coating. Unlike standard breadcrumbs, panko is airy, flaky, and delivers an incredible, shatteringly crisp crunch that stands up against the creamy interior. When combined with the fresh, zesty bite of chopped chives and the reserved bacon pieces, this coating provides a textural interplay that is utterly delightful. This crunchy armor against the smooth, spicy creaminess of the inner Jalapeño Popper Cheese Ball is what truly sets this recipe apart from the competition.
Why You Should Try This Recipe Right Now
If you need further convincing to grab that block of cream cheese, consider the practical benefits and the guaranteed success rate of making this incredible spicy cheese ball. This recipe transcends seasonal boundaries; it’s perfect for summer BBQs, holiday appetizer spreads (imagine it next to a Cranberry Pecan Cheese Ball!), or simply enjoying while watching football.
The Crowd-Pleaser Guarantee
Jalapeño poppers are universally loved. They combine the comfort of creamy cheese with the excitement of heat. By presenting these flavors in a sophisticated, easy-to-serve format, you are virtually guaranteed a successful dish. People gravitate toward dishes they recognize and adore, and the spicy bacon cheese ball profile hits that comfort zone perfectly. It’s rich, satisfying, and deeply flavorful making it the first appetizer to disappear at any potluck.
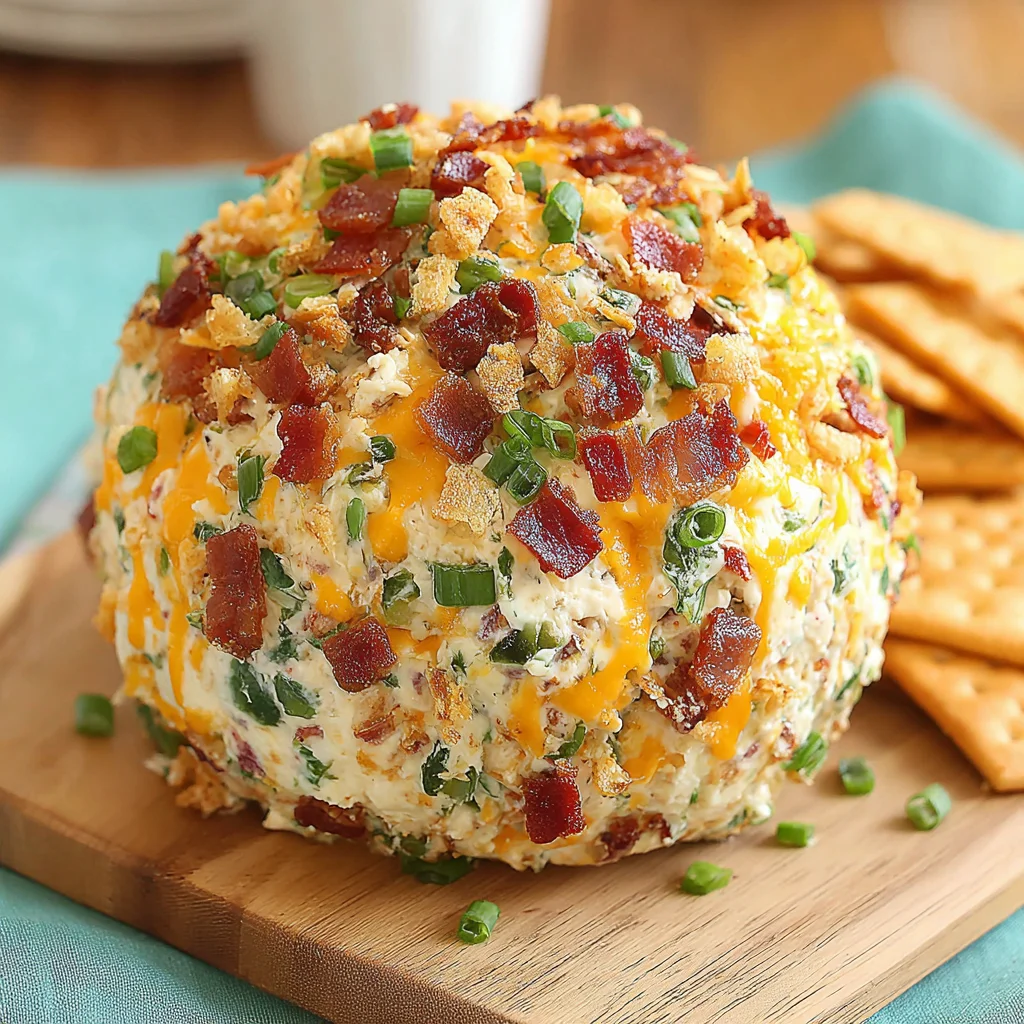
Moreover, the sheer visual appeal of a perfectly shaped, brightly coated cheese ball is undeniable. The green of the chives, the golden hue of the panko, and the flecks of red jalapeño make this dish a centerpiece. It invites interaction; guests love dipping their chosen crackers into the large, firm sphere, breaking through the crunchy shell to access the creamy interior.
Cost-Effective and Ingredient Accessible
Unlike some extravagant appetizer recipes that require specialized components, the ingredients for this Jalapeño Popper Cheese Ball are widely available and relatively inexpensive. Cream cheese, cheddar, bacon, and jarred jalapeños are staples found in any major grocery store. This makes it an incredibly budget-friendly option for feeding a large crowd without compromising on quality or flavor. You get a high-impact, gourmet-tasting appetizer for a fraction of the cost of store-bought alternatives.
Customization and Dietary Flexibility
While the classic recipe is magnificent, it provides a fantastic base for customization. Need less heat? Swap some of the jalapeños for finely diced green chilies. Want a deeper flavor? Use smoked cheddar instead of sharp cheddar. The structure is forgiving, allowing you to tailor the spice level and cheese profile to your specific preferences or the needs of your guests. This adaptability ensures that the Jalapeño Popper Cheese Ball remains fresh and exciting, even if you make it repeatedly throughout the year.
If you’re looking for more comforting, savory appetizers, consider checking out my collection of party dips and spreads on Pinterest. This link to my Pinterest board offers many complementary recipes perfect for mixing and matching with your new favorite Jalapeño Popper Cheese Ball.
Ingredients and Necessary Utensils for the Best Jalapeño Popper Cheese Ball
Success starts with preparation, especially ensuring your ingredients are at the correct temperature. This section breaks down the essential components and the few tools required to seamlessly assemble this spicy cheese ball.
H3: The Critical Components (Ingredients)
Using high-quality ingredients truly makes a difference in the final taste and texture of this creamy, spicy treat. Always measure ingredients precisely for the best results.
For the Cheese Ball Base:
- 2 (8-ounce) blocks cream cheese: The single most important ingredient. It must be completely softened to room temperature. If it’s cold, your mixer will struggle, and the final texture will be lumpy instead of smooth and fluffy.
- 2 cups shredded sharp cheddar cheese (or Pepper Jack), divided: Sharp cheddar provides the necessary tang and complexity. Pepper Jack is an excellent variation if you want to amplify the heat without adding more jalapeños. We use 1 1/2 cups in the creamy base and reserve 1/2 cup to fold in later, adding visual appeal and pockets of melt-in-your-mouth cheese.
- 1/2 cup grated Parmesan cheese: Provides intense umami and saltiness. Use finely grated Parmesan for the best integration into the cream cheese base.
- 1/2 cup mayonnaise or sour cream: This acts as a binder and adds crucial moisture, making the cheese ball easier to mix and giving it a softer, more scoopable texture when served. Sour cream adds a lovely tang, while mayonnaise contributes richness.
- 1/2 cup crispy cooked bacon, crumbled (reserve 2 tablespoons for coating): The bacon must be very crispy, as soggy bacon will introduce moisture and ruin the structural integrity of the cheese ball. Cook it well and pat it dry before crumbling.
- 1/4 cup finely diced jarred or canned jalapeños: Crucial Preparation Step: These must be drained very well and patted dry with paper towels. Excess liquid is the enemy of a firm cheese ball. Use gloves when handling if you are sensitive to capsaicin.
- 1 teaspoon garlic powder & 1/2 teaspoon onion powder: These aromatic powders ensure the savory depth permeates every part of the mixture. Avoid fresh garlic or onion, as their moisture content can destabilize the mixture during chilling.
- 1/2 teaspoon black pepper & 1/4 teaspoon salt: Adjust the salt carefully based on the saltiness of your bacon and Parmesan. It’s always better to under-salt and taste-test before the final shape.
For the Irresistible Coating:
- 1 cup panko breadcrumbs: Panko provides superior crunch compared to regular breadcrumbs. Toasting the panko, as detailed in the instructions, is highly recommended for maximum flavor and crunch.
- 2 tablespoons butter, melted (optional, for toasting panko): Used exclusively if you choose to toast your panko for that deep, nutty flavor.
- 1/4 cup fresh chives, finely chopped: Adds a beautiful pop of green, a subtle oniony flavor, and crucial freshness that cuts through the richness of the cheese.
- Remaining 2 tablespoons crispy bacon crumbles: Reserved for the exterior, enhancing both flavor and visual texture.
H3: Essential Tools and Kitchen Utensils
You don’t need fancy equipment, but a few key items will ensure the process is smooth and the results are professional.
- Large Mixing Bowl: Essential for combining the base ingredients.
- Electric Hand Mixer or Stand Mixer: Highly recommended. While you can mix this by hand, achieving the “light and fluffy” texture that ensures smooth incorporation of the cold ingredients (like the cheddar) is much easier with an electric mixer.
- Rubber Spatula: Necessary for scraping down the bowl and gently folding in the delicate fillings (jalapeños and bacon) to prevent overmixing.
- Measuring Cups and Spoons: For accurate ingredient ratios.
- Paper Towels: Absolutely necessary for draining and drying the jalapeños and bacon.
- Plastic Wrap: Crucial for shaping and chilling. Use a large, generous sheet to handle the sticky mixture easily.
- Small Skillet (optional): Needed if you decide to toast the panko breadcrumbs.
- Shallow Dish or Pie Plate: Ideal for rolling the chilled cheese ball evenly in the coating mixture.
Preparing the base ingredients and gathering these simple tools ensures you’ll move quickly through the preparation steps, keeping your total active time minimal.
Detailed Instructions for Assembling the Spicy Jalapeño Popper Cheese Ball
Follow these steps precisely, paying close attention to temperature and chilling times, to create a cheese ball with the perfect texture and unforgettable flavor.
Step 1: Prepare the Fluffy Cheese Base
The key to a smooth, elegant cheese ball is starting with a perfectly homogenized base. Do not rush the softening process.
- Combine Primary Cheeses: Place the completely softened cream cheese (this is critical!), the Parmesan cheese, and 1 1/2 cups of the shredded cheddar cheese into your large mixing bowl. Make sure to reserve the remaining 1/2 cup of shredded cheddar for Step 2.
- Add Wet and Dry Ingredients: Add the mayonnaise (or sour cream), garlic powder, onion powder, salt, and pepper to the bowl.
- Whip Until Fluffy: Using an electric hand mixer or a stand mixer fitted with the paddle attachment, beat the mixture on medium speed. Start slow to prevent splashing. Continue beating until all ingredients are completely smooth, light, and fluffy. This high speed incorporates air, creating a wonderfully creamy texture. Scrape down the sides of the bowl frequently to ensure even mixing. This step usually takes a solid 2 to 3 minutes.
Tip: If your cream cheese wasn’t soft enough, you might feel small, cold lumps. Keep mixing until the entire base is uniform and velvety smooth. A lumpy base leads to a crumbly final product.
Step 2: Fold in the Fillings for the Jalapeño Popper Cheese Ball
After achieving that airy base, we need to introduce the jalapeño popper elements bacon, spice, and more cheddar without deflating the mixture.
- Introduce the Flavors: Using a rubber spatula (put the mixer away!), gently fold the well-drained and patted-dry jalapeños, the 1/2 cup of crumbled bacon, and the remaining 1/2 cup of reserved shredded cheddar cheese into the cream cheese mixture.
- Mix Just Enough: Mix just until the inclusions are evenly distributed throughout the cheese mixture. The goal is dispersal, not demolition. Avoid overmixing, as too much folding can introduce heat back into the mixture, making it too soft to shape properly in the next step.
Pro Tip: Ensure the jalapeños are as dry as possible. Any residual moisture will leach out during chilling, compromising the texture of your Jalapeño Popper Cheese Ball.
Step 3: Shape and Critically Chill the Ball
This is where the structure comes together. Do not underestimate the power of chilling!
- Lay the Foundation: Lay a large, heavy-duty sheet of plastic wrap (about 18×18 inches) on your counter surface.
- Deposit the Mixture: Spoon the entire cheese mixture onto the center of the plastic wrap.
- Shape the Sphere: Use the plastic wrap to help you gather and compress the mixture into a uniform, tight sphere (a perfect ball). If necessary, work the edges gently through the plastic wrap to smooth out any bumps.
- Wrap Tightly: Once shaped, wrap the cheese ball tightly in the plastic wrap, ensuring there are absolutely no air pockets.
- The Critical Chill: Place the wrapped cheese ball in the refrigerator to chill and firm up for at least 2 hours, or preferably up to 4 hours. The chilling step is absolutely crucial for achieving a firm, dense, rollable texture that holds up when serving.
If you plan to serve the cheese ball for a major event like a game-day party, making it the night before (12+ hours chill time) guarantees optimal firmness.
Step 4: Prepare the Crunchy Coating (Toast the Panko!)
This step adds maximum texture and flavor, turning a great appetizer into an exceptional one.
- Toast the Panko (Recommended): If you want the ultimate crunch, melt 2 tablespoons of butter in a small skillet over medium heat. Add the panko breadcrumbs and toast, stirring constantly, until they turn a light golden brown and smell fragrant (about 3–5 minutes). Remove from heat immediately and allow them to cool completely. If skipping this step, simply use plain raw panko.
- Mix the Coating: In a shallow dish or pie plate, combine the cooled panko breadcrumbs, the finely chopped fresh chives, and the remaining 2 tablespoons of reserved crispy bacon crumbles. Mix the coating ingredients well to ensure even distribution.
Note: Waiting for the panko to cool is essential. Rolling the cold cheese ball in warm panko can cause the surface to soften, making the coating process messy.
Step 5: Coat and Serve the Jalapeño Popper Cheese Ball
The final, satisfying step before presentation.
- Unwrap and Coat: Remove the chilled cheese ball from the refrigerator and unwrap the plastic wrap.
- Roll Vigorously: Place the firm cheese ball into the shallow dish containing the coating mixture. Gently roll the cheese ball, pressing the coating onto the surface firmly with your hands until the entire ball is evenly and thoroughly covered. Do not be shy press firmly to embed the panko mixture.
- Serve or Store: The Jalapeño Popper Cheese Ball can be served immediately with an array of dippers, or you may refrigerate it again for up to 2 days before serving.
- Serving Suggestions: Serve with sturdy crackers (Ritz or Triscuit hold up well), toasted baguette slices, pretzel thins, or fresh vegetable sticks (celery, carrots, bell peppers) for a lighter option. For a complementary savory dish, you might enjoy serving it alongside a creamy pimento cheese dip.
Tips, Troubleshooting, and Delicious Variations
While this recipe is straightforward, a few expert tips can ensure perfection every time. Plus, explore ways to customize your next batch!
H3: Troubleshooting Common Mistakes
1. Why is My Cheese Ball Too Soft?
The number one reason for a soft, sloppy cheese ball is insufficient chilling time or using ingredients that were too warm or wet.
- Solution: Ensure your cream cheese is only softened, not melted. More importantly, confirm the jalapeños and bacon are completely dry. If your mixture feels too soft right after mixing, add 1-2 tablespoons of flour or cornstarch (if serving immediately, or if cooking) or simply chill it for an extra hour before shaping. If it’s too soft right before serving, place it in the freezer for 20 minutes to firm up rapidly.
2. My Coating Isn’t Sticking!
This happens when the cheese ball isn’t cold enough or when the coating is too coarse.
- Solution: Ensure the cheese ball is very cold (Step 3 is key). If you’ve skipped the toast step, the raw panko might be dusty in this case, try pressing the coating on slightly harder. If necessary, lightly brush the outside of the cheese ball with a tiny bit of water or mayonnaise before rolling to create a tacky surface, though this usually isn’t needed if the chilling is adequate.
3. How to Make It Less Spicy?
Jarred jalapeños vary in heat. If you’re catering to a crowd that prefers mild appetizers, you have options.
- Solution: Replace half of the diced jalapeños with finely diced green chilies (mild, canned), which provide the flavor without the intense heat. Alternatively, simply reduce the amount of jalapeños to 2 tablespoons.
H3: Exciting Variations and Substitutions
The foundation of this Jalapeño Popper Cheese Ball is flexible enough to support several delicious variations.
Cheese Variations
- Smoked Cheese Ball: Substitute the sharp cheddar with smoked Gouda or smoked provolone for a deep, woodsy flavor that pairs exceptionally well with bacon.
- Pepper Jack Amplification: Use Pepper Jack cheese exclusively for the shredded cheddar component to create a uniform spice level throughout the entire ball.
Protein Substitutions
If bacon isn’t your favorite, try these savory alternatives:
- Prosciutto or Ham: Finely dice and crisp prosciutto or high-quality deli ham. Ensure they are dry before adding them.
- Vegetarian Popper Ball: Skip the bacon entirely. Instead, add sun-dried tomatoes (pat dry!) for umami flavor and 1/4 cup of finely chopped pecans or walnuts for extra crunch.
Coating Customizations
- Everything Bagel Spice: Swap out the panko/chive coating for Everything Bagel Seasoning mix for a sesame, garlic, and poppy seed crust. This adds an incredible aromatic element.
- Nutty Crunch: Combine finely chopped pecans or walnuts with the chives for a more traditional, nutty coating that complements the creaminess.
Gluten-Free Option
To make this Jalapeño Popper Cheese Ball entirely gluten-free, simply ensure the cheese and mayonnaise are certified gluten-free, and replace the panko breadcrumbs with a blend of finely crushed, certified gluten-free pretzels or use finely chopped nuts (like almonds or pecans) mixed with the chives and bacon.
Nutritional Values and Ingredient Benefits
While the Jalapeño Popper Cheese Ball is undoubtedly a decadent treat intended for celebratory occasions, understanding its nutritional makeup helps in balanced consumption. Due to the high content of dairy and bacon, this appetizer is rich in fats and protein.
General Nutritional Profile (Approximate, per 1/15th serving)
Please note: These are estimates and depend heavily on the specific brand of mayonnaise, bacon, and cheddar used.
- Calories: 250–300 kcal
- Total Fat: 22–27 g
- Saturated Fat: 12–15 g
- Protein: 10–12 g
- Carbohydrates: 2–4 g (mainly from panko and small amounts in dairy)
- Sodium: 350–450 mg (Variable based on bacon and cheese)
Benefits of Key Ingredients
1. Dairy (Cream Cheese, Cheddar, Parmesan)
The cheese base is a powerhouse of calcium and protein. Dairy is essential for bone health. While the saturated fat content is high, the protein provided by the cheeses helps promote satiety, ensuring that a small serving is satisfying. Parmesan, in particular, is a source of concentrated flavor and natural glutamates (umami), which make the entire dish taste richer.
2. Jalapeños (Capsaicin)
The heat in the jalapeños comes from capsaicin, a compound known for its anti-inflammatory properties. Beyond the flavor, consuming capsaicin can temporarily boost metabolism and is linked to pain relief. Jalapeños also contain small amounts of Vitamin C and Vitamin A.
3. Bacon (Protein and Micronutrients)
Bacon contributes significant flavor, protein, and essential micronutrients like B vitamins (B1, B2, B3, B5, B6, B12), and minerals like selenium and phosphorus. Choosing high-quality, less processed bacon can slightly improve the nutritional profile.
As this dish is rich, remember the serving context. Pair this savory treat with high-fiber dippers like whole-grain crackers or raw vegetables to create a more balanced snack plate. This makes the indulgence of the creamy, spicy Jalapeño Popper Cheese Ball feel entirely justified.
Frequently Asked Questions about the Jalapeño Popper Cheese Ball
H2: FAQs on Making the Perfect Jalapeño Popper Cheese Ball
How far in advance can I make the Jalapeño Popper Cheese Ball?
You can prepare the cheese ball mixture, shape it, and chill it (uncoated) up to 3 to 4 days ahead of time. This extended chilling time actually improves the flavor integration. Wait to roll it in the panko coating until just 1–2 hours before serving to ensure the coating remains crisp and fresh.
Can I use fresh jalapeños instead of jarred ones?
Yes, but exercise caution regarding moisture and heat. If using fresh jalapeños, you must remove the seeds and membranes, finely dice them, and blanch them briefly in boiling water, followed by an ice bath. This process slightly softens them and reduces the raw, aggressive heat, though you must pat them extremely dry afterward to prevent liquid from ruining the cheese ball structure.
What is the best way to store leftover Jalapeño Popper Cheese Ball?
If there are leftovers, wrap the cheese ball tightly in fresh plastic wrap or place it in an airtight container. It will keep well in the refrigerator for up to 5 days. Note that the panko coating may soften over time, but the core flavor will remain excellent. For best results, scrape off the old coating and roll it in a fresh batch of panko before re-serving.
Why is cream cheese temperature so important for this Jalapeño Popper Cheese Ball recipe?
If the cream cheese is cold, it won’t blend smoothly with the cheddar and Parmesan, resulting in a lumpy texture. Room temperature cream cheese (soft but not greasy) whips up beautifully into a light, airy base that easily incorporates the other cheeses and binders, leading to a much better, cohesive final structure once chilled.
What are the best dippers to serve with this spicy cheese ball?
Choose dippers that are sturdy enough to handle the firm consistency and rich texture. Hearty, whole-grain crackers, thin slices of toasted baguette (crostini), pretzel crisps, and sturdy tortilla chips are excellent choices. For a fresh contrast, use vegetable sticks like celery, carrots, or slices of cucumber.
Can I freeze a cheese ball?
Yes, you can freeze the Jalapeño Popper Cheese Ball! Prepare the mixture, shape it, and wrap it extremely tightly in plastic wrap, followed by a layer of foil. Freeze for up to one month. Thaw overnight in the refrigerator, and then coat it with the panko mixture just before serving. Note that the texture of the cream cheese might be slightly grainier after freezing, but the flavor remains excellent.
Conclusion: Your New Favorite Spicy Appetizer
The Jalapeño Popper Cheese Ball is more than just an appetizer it’s a showstopper that guarantees flavor, texture, and pure comfort. By combining the creamy heat of jalapeño poppers with the elegance and convenience of a classic cheese ball, this recipe ensures effortless entertaining with spectacular results. We’ve covered everything from ensuring your cream cheese is perfectly soft to the crucial necessity of chilling the mixture for at least two hours to guarantee a firm, rollable product.
Remember the key takeaways: soft cream cheese is mandatory, drain your jalapeños completely, and don’t skip toasting that panko for the ultimate crunch. Whether you’re preparing for a holiday gathering, a major sports event, or just craving a savory, spicy snack, this recipe offers flexibility and massive flavor payoff for minimal active time. The beautiful blend of sharp cheddar, savory bacon, and a delightful spicy kick encased in a crispy shell makes the Jalapeño Popper Cheese Ball truly unforgettable.
We highly encourage you to try this long and easy recipe soon. Once you experience the satisfying crunch of the toasted coating giving way to the rich, spicy interior, you’ll understand why this dish has earned its spot as a party favorite. If you decide to make this delicious Jalapeño Popper Cheese Ball, please leave a comment below and let me know how you served it! If you enjoyed this savory recipe, you might also be interested in my guide to making easy crockpot sides for your next holiday meal.
Jalapeño Popper Cheese Ball (Spicy & Easy Appetizer)
Ingredients
Equipment
Method
- Place the completely softened cream cheese, Parmesan cheese, and 1 1/2 cups of the shredded cheddar cheese into a large mixing bowl. Reserve the remaining 1/2 cup shredded cheddar for the filling. Add the mayonnaise (or sour cream), garlic powder, onion powder, salt, and pepper.
- Using an electric hand mixer or a stand mixer fitted with the paddle attachment, beat the mixture on medium speed until all ingredients are completely smooth, light, and fluffy (2 to 3 minutes), scraping down the sides of the bowl as needed.
- Using a rubber spatula, gently fold the well-drained jalapeños, the 1/2 cup of crumbled bacon, and the remaining 1/2 cup of reserved shredded cheddar cheese into the cream cheese mixture. Mix just until the inclusions are evenly distributed throughout the mixture. Avoid overmixing.
- Lay a large sheet of plastic wrap on your counter. Spoon the entire cheese mixture onto the center. Use the plastic wrap to help you gather and shape the mixture into a uniform, tight sphere.
- Wrap the cheese ball tightly in the plastic wrap and place it in the refrigerator to chill and firm up for at least 2 hours, or preferably up to 4 hours. The chilling step is crucial for achieving a firm, rollable texture.
- Optional Step for Extra Crunch: In a small skillet, melt the 2 tablespoons of butter over medium heat. Add the panko breadcrumbs and toast, stirring frequently, until they are golden brown and fragrant (about 3–5 minutes). Remove from heat and allow to cool completely. (If skipping this step, use plain raw panko.)
- In a shallow dish or pie plate, combine the cooled panko breadcrumbs, the chopped fresh chives, and the remaining 2 tablespoons of reserved crispy bacon crumbles. Mix the coating ingredients well.
- Remove the chilled cheese ball from the refrigerator and unwrap the plastic wrap. Place the firm cheese ball into the shallow dish containing the coating mixture.
- Gently roll the cheese ball, pressing the coating onto the surface firmly with your hands until the entire ball is evenly and thoroughly covered.
- Serve immediately with sturdy crackers, toasted baguette slices, pretzel thins, or fresh vegetable sticks. This cheese ball can be made up to 2 days ahead of time (store covered in the refrigerator).