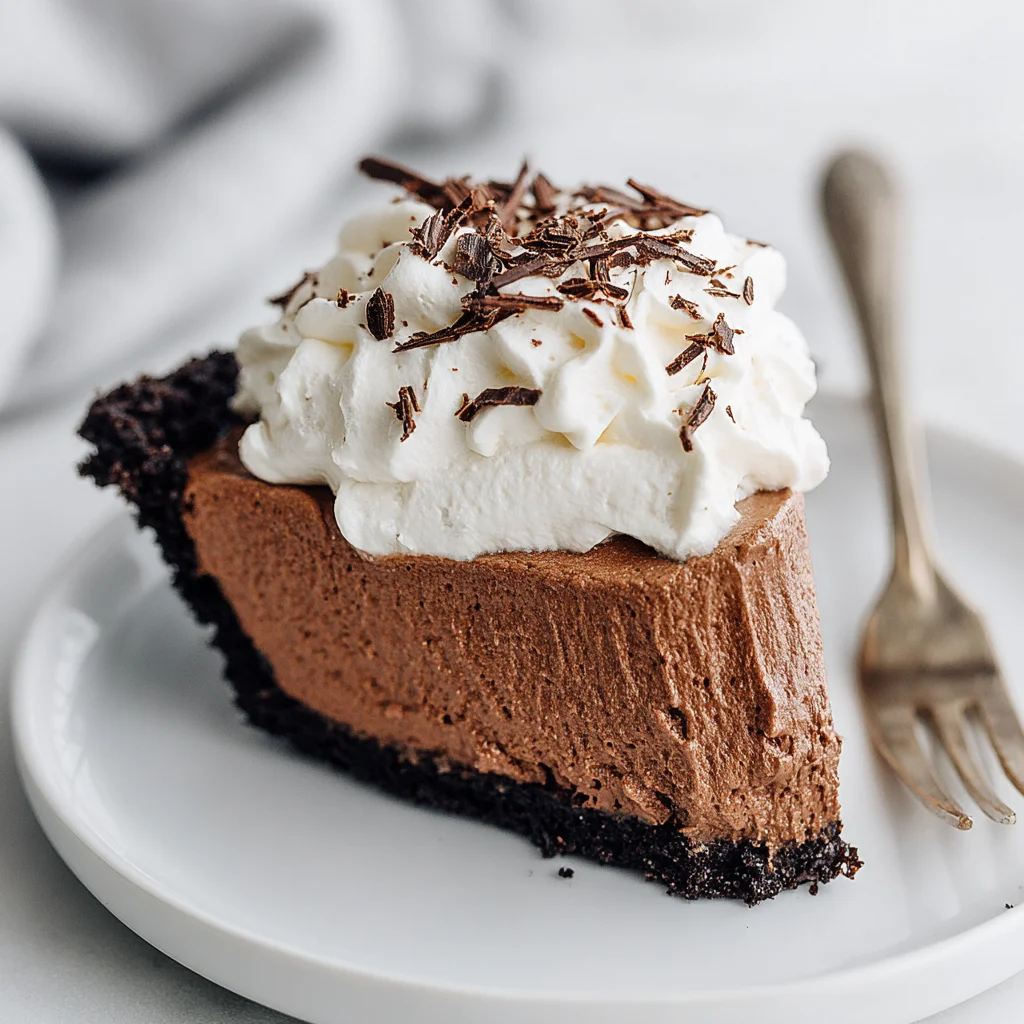
Welcome to the dessert hall of fame! Few recipes conjure up the same level of creamy, decadent nostalgia as the traditional Chocolate Silk Pie Recipe. This isn’t just a dessert; it’s an experience a rich, velvety chocolate cloud nestled in a crisp, buttery crust, crowned with a mountain of fresh, airy whipped cream.
If you’ve ever felt intimidated by pie baking, set those fears aside. While this classic pie looks and tastes incredibly sophisticated, the filling itself is famously no-bake. The secret to its incredible texture lies in one simple technique: vigorous whipping of the butter, sugar, and eggs. This process, detailed thoroughly below, incorporates air, transforming simple ingredients into a filling so smooth it lives up to its name pure chocolate silk.
We start with a simple, pre-baked chocolate crumb crust (though graham crackers work just as well) and move quickly into the star of the show: the impossibly airy chocolate filling. Remember, this recipe requires high-quality ingredients and a critical safety warning: because the filling uses raw eggs, you absolutely must use high-quality, pasteurized eggs to eliminate the risk of salmonella. Done right, this Chocolate Silk Pie Recipe will be the centerpiece of any holiday table or special occasion, offering a deep, intense chocolate flavor that melts effortlessly in your mouth.
Why You’ll Love This Chocolate Silk Pie Recipe
The beauty of the classic Chocolate Silk Pie Recipe lies in its harmonious contrast of textures and temperatures. It combines a cool, firm filling with a light, airy topping, all supported by a crunchy crust. This isn’t your average pudding pie; this is elevated, luxurious chocolate enjoyment. Here are several compelling reasons why this recipe will become a permanent fixture in your culinary repertoire:
1. Unmatched Texture and Mouthfeel
The term “silk” is not an exaggeration. Unlike heavy chocolate cream pies, the silk filling is lightened significantly through the extended beating process. This aeration incorporates minute air bubbles, giving the filling a truly ethereal quality. When chilled, it sets beautifully, maintaining its fluffy structure while offering a melt-in-your-mouth richness. It’s the perfect balance between mousse and firm custard a texture that store-bought pies simply cannot replicate. The combination of the cool, silky filling against the sweet crunch of the chocolate cookie crust creates an irresistible bite.
2. Intense, Yet Balanced Chocolate Flavor
We use high-quality unsweetened baking chocolate, which provides a deep, complex, and true chocolate flavor without the cloying sweetness often found in other desserts. The high quantity of butter and sifted powdered sugar smooths out the bitterness, resulting in a perfectly balanced sweetness that appeals to both dark chocolate enthusiasts and milk chocolate lovers alike. This recipe truly celebrates the purity of cocoa, making it a spectacular dessert for serious chocolate aficionados looking for a deep-dive into rich flavor profiles.
3. Mostly No-Bake Convenience
While the crust requires a quick 8-10 minute bake, the main event the creamy, chocolate center requires zero oven time. This makes the Chocolate Silk Pie Recipe an ideal choice, especially during warm weather or when you need to free up oven space during the holidays. After the initial prep (which takes about 20 minutes), the refrigerator does all the heavy lifting, cooling the pie into its magnificent, sliceable form. This low-effort, high-reward approach is a massive win for busy home cooks who still want to deliver show-stopping results.
4. A Classic That Never Fails to Impress
There’s a reason this pie is a classic. It’s elegant, comforting, and visually stunning, especially when adorned with fresh whipped cream and chocolate shavings. Whether you are hosting a formal dinner party or simply looking for a special weekend treat, slicing into a homemade Chocolate Silk Pie Recipe brings gasps of delight. Its rich color and perfect layers make it instantly recognizable as a top-tier dessert, signaling skill and care in the kitchen. For more impressive, yet simple dessert ideas, check out our Pinterest board full of decadent desserts.
Why You Must Try This Decadent Dessert Tonight
Beyond the simple enjoyment of chocolate, incorporating this Chocolate Silk Pie Recipe into your dessert rotation offers several practical and emotional benefits. This pie isn’t just about taste; it’s about mastering a signature dessert that showcases your culinary confidence and brings genuine joy to those you share it with.
Mastering the Art of Silky Filling
Many dessert recipes rely on gelatin, pudding mixes, or cornstarch for thickening. The true, authentic Chocolate Silk Pie Recipe relies solely on the emulsification created by the butter, sugar, and raw eggs. Learning this technique is valuable. It teaches you how proper aeration and temperature control can change the physical structure of a dessert mixture, resulting in a natural thickness and unparalleled smoothness. The critical 5-minute high-speed beat time in Step 2 is transformative it’s where the magic happens, turning a loose batter into a dense, creamy foundation.
Perfect for Make-Ahead Preparation
If you are planning a meal or preparing for a holiday like Thanksgiving or Christmas, desserts that require lengthy chilling are your best friends. Since this Chocolate Silk Pie Recipe needs a minimum of six hours (and ideally overnight) to set perfectly, you can prepare it entirely the day before your event. This significantly reduces last-minute stress. All that’s left to do just before serving is whipping the cream a task that takes less than five minutes. This make-ahead capability ensures you spend less time scrambling and more time enjoying your guests.
A Versatile Base for Customization
While the classic version is perfect as is, the rich chocolate base is incredibly versatile. It acts as a blank canvas for various flavor additions. Want a hint of mint? Add a few drops of peppermint extract. Craving a boozy twist? A tablespoon of bourbon or coffee liqueur can be incorporated during the final beating stage. This adaptability means the core Chocolate Silk Pie Recipe can be tweaked seasonally or according to personal preference, making it a dessert that never gets boring.
Better Than Any Store-Bought Alternative
Let’s be honest: pre-made chocolate pies often fall short, tasting artificial or overly sugary. By making this pie from scratch, you control every ingredient. You choose the quality of the chocolate, the freshness of the butter, and the richness of the vanilla extract. The difference in flavor between a homemade Chocolate Silk Pie Recipe and a mass-produced version is astronomical. The intense, bittersweet notes of high-quality cocoa shine through, proving that sometimes, the simplest recipes yield the most profound flavors.
Essential Ingredients and Tools for the Perfect Chocolate Silk Pie Recipe
The success of this pie hinges on both the quality of your ingredients and the application of the proper tools, particularly a powerful mixer. Pay close attention to the state of the butter and chocolate temperature control is paramount in achieving that signature silky texture.
I. For the Crust (The Foundation)
- 1 1/2 cups finely crushed chocolate cookie crumbs: While Nabisco Wafers or Oreo crumbs (filling removed) are traditional, you can substitute graham cracker crumbs if you prefer a less intensely chocolate base. The key is fineness; the crumbs must be uniform for a stable crust.
- 1/4 cup granulated sugar: Provides a slight structural firmness and sweetness to complement the salty butter.
- 6 tablespoons unsalted butter, melted: Use unsalted butter to control the overall saltiness. Ensure it is fully melted so it can evenly coat all the crumbs.
Crust Preparation Tips
A common mistake is not compacting the crust enough. Use the flat bottom of a measuring cup to press the mixture firmly against the pie plate. Baking the crust briefly sets the butter, preventing a crumbly mess when you slice the pie. Ensure the crust is completely cool before adding the filling; residual heat can melt the butter in the silk filling.
II. For the Chocolate Silk Filling (The Star)
This section is the heart of the Chocolate Silk Pie Recipe and requires attention to detail, especially regarding temperature and safety.
- 1 cup (2 sticks) unsalted butter, softened to room temperature: Butter must be genuinely soft, but not greasy or melted. If it’s too cold, it won’t cream properly with the sugar, leading to a grainy texture.
- 1 1/2 cups powdered sugar, sifted: Sifting is mandatory here! Powdered sugar often contains lumps that refuse to dissolve, resulting in an unpleasant grainy filling.
- 1 teaspoon pure vanilla extract: Use pure extract for the best flavor; imitation vanilla will dull the overall taste.
- 4 ounces high-quality unsweetened baking chocolate, melted and cooled slightly: Choose a quality brand (Ghirardelli, Baker’s, or Callebaut). Crucially, the melted chocolate should feel barely warm to the touch, or even cool. If it is too hot, it will melt the creamed butter/sugar mixture, ruining the emulsification.
- 4 large eggs: ⚠️ Food Safety Warning: Since the filling is no-bake and the eggs remain raw, you MUST use pasteurized eggs for this recipe to ensure safety. Pasteurized eggs are heat-treated to kill bacteria while remaining safe for consumption in raw preparations. Do not skip this step or substitute with non-pasteurized eggs.
III. For the Topping (The Crown)
A store-bought whipped cream can never compare to the fresh, slightly sweet, and immensely airy homemade version.
- 1 1/2 cups cold heavy whipping cream: Must be cold! Use a cold bowl and cold whisk attachment for the fastest and most stable peaks.
- 1/4 cup powdered sugar: Sweetens the cream subtly.
- 1/2 teaspoon pure vanilla extract: Enhances the flavor.
- Chocolate shavings, for garnish (optional): Use a vegetable peeler against a block of chocolate for beautiful, delicate curls.
Necessary Tools for the Chocolate Silk Pie Recipe
While you could theoretically make this with a hand mixer, a stand mixer is highly recommended due to the required extended beating time (5+ minutes on high speed).
- 9-inch Deep-Dish Pie Plate: Ensures enough volume for the generous filling.
- Stand Mixer (Highly Recommended): Essential for achieving the light, silky consistency in the filling. Use the paddle attachment for creaming and the whisk attachment for the topping.
- Measuring Cups and Spoons: For precise ingredient measurement.
- Rubber Spatula: Necessary for scraping down the bowl during the creaming process and smoothing the filling.
- Wire Rack: For cooling the crust evenly.
- Sifter or Fine-Mesh Strainer: Crucial for sifting the powdered sugar.
Getting your tools and ingredients organized before you begin (mise en place) is the first step toward perfecting this decadent Chocolate Silk Pie Recipe.
Step-by-Step Guide to the Ultimate Chocolate Silk Pie Recipe
Follow these instructions closely, especially the timings for the beating process, as they are non-negotiable for achieving the signature silky consistency of this pie.
Step 1: Prepare the Crust (The Firm Foundation)
- Preheat and Combine: Preheat your oven to 350°F (175°C). In a medium bowl, thoroughly combine the 1 1/2 cups of crushed chocolate cookie crumbs and the 1/4 cup of granulated sugar.
- Bind the Crumbs: Pour the 6 tablespoons of melted butter over the crumb mixture. Stir until every crumb is evenly moistened and the mixture resembles wet sand.
- Press and Compact: Press the mixture firmly and evenly into the bottom and up the sides of your 9-inch deep-dish pie plate. Use the bottom of a flat measuring cup to really pack the crumbs tightly this prevents crumbling when slicing.
- Bake and Cool: Bake the crust for 8 to 10 minutes until it looks set and slightly dry. Remove it from the oven immediately. Place the pie plate on a wire rack and allow the crust to cool completely. This cooling step is essential before adding the filling.
Step 2: Prepare the Chocolate Silk Filling (The Magic Formula)
This step requires patience and power mixing. Remember to use only pasteurized eggs for safety!
- Cream the Butter: In the bowl of a stand mixer fitted with the paddle attachment, cream the 1 cup of softened, room-temperature butter on medium speed for about 1 minute until it is visibly smooth.
- Whip with Sugar: Gradually add the 1 1/2 cups of sifted powdered sugar. Start on low speed to avoid a sugar explosion, then increase to medium-high speed. Beat this mixture until it is noticeably light, fluffy, and significantly pale in color. This creaming process should take a full 4 to 5 minutes. Stop frequently to scrape down the sides and bottom of the bowl. This incorporates air, which is the key to lightness.
- Add Chocolate and Vanilla: Reduce the speed to low. Add the melted and slightly cooled chocolate and the vanilla extract. Beat until just combined, then increase to medium speed and mix for another minute until the chocolate is uniformly incorporated.
- Incorporate the Eggs (Crucial Step): Ensure your eggs are pasteurized. With the mixer running on medium speed, add the eggs one at a time, beating for 30 seconds after each addition. The mixture may look slightly curdled or grainy at this point do not worry, the next step fixes this.
- Achieve the Silky Texture: Once all four eggs are incorporated, increase the mixer speed to high. Beat the filling vigorously for a full 5 minutes without stopping. This long, high-speed beating time is absolutely crucial. It emulsifies the eggs and butter, incorporates massive amounts of air, and breaks down any remaining sugar crystals. The resulting filling will lighten dramatically in color and volume and develop its characteristic smooth, silky texture.
For another rich dessert that relies on texture, you might enjoy our Gooey Butter Cookies.
Step 3: Assemble and Chill the Pie
- Fill the Crust: Carefully spoon the light and airy chocolate silk filling into the completely cooled pie crust.
- Smooth the Top: Use a rubber spatula or the back of a spoon to gently smooth the surface of the filling.
- Chill Time: Cover the pie loosely with plastic wrap or foil. Ensure the wrap does not touch the filling. Refrigerate the pie for a minimum of 6 hours, but ideally, let it chill overnight. The filling must be firm and fully set before serving.
Step 4: Prepare the Whipped Topping and Serve
- Prepare the Whipped Cream: Just before serving (whipped cream is best fresh), place the cold heavy whipping cream, 1/4 cup powdered sugar, and 1/2 teaspoon vanilla extract into a cold stand mixer bowl fitted with the whisk attachment.
- Whip to Stiff Peaks: Beat on medium-high speed until stiff peaks form. The cream should hold its shape firmly. Be vigilant: beating for even 30 seconds too long can result in butter!
- Garnish and Serve: Spread or pipe the freshly whipped cream generously over the chilled Chocolate Silk Pie Recipe. Garnish the top with delicate chocolate shavings, if desired.
- Storage: Slice and serve immediately. Store any leftovers (if there are any!) tightly covered in the refrigerator.
This process results in the quintessential, decadent Chocolate Silk Pie Recipe that is guaranteed to impress.
Tips, Troubleshooting, and Delicious Variations of the Chocolate Silk Pie Recipe
While the recipe is straightforward, there are a few common pitfalls and several ways to customize this classic to suit dietary needs or flavor preferences.
Troubleshooting Common Issues
1. Runny Filling
If your filling doesn’t set, the most likely culprit is insufficient beating time in Step 2, or ingredients that were incorporated at the wrong temperature.
- The Fix: Ensure you beat the filling for the full 5 minutes on high speed. The eggs and butter must fully emulsify to provide structure. Also, make sure the melted chocolate was cool when added; hot chocolate will melt the creamed butter, causing separation and preventing proper setting.
2. Grainy or Sugary Texture
A grainy texture usually means the powdered sugar did not dissolve properly, often because it wasn’t sifted or the butter was too cold.
- The Fix: Always sift your powdered sugar. Secondly, ensure your butter is truly room temperature and soft before starting the creaming process.
Pro Tips for the Best Results
- Chill Your Bowl and Whisk: For the quickest and most stable whipped cream, place your mixer bowl and whisk attachment in the freezer for 10-15 minutes before whipping the cream.
- Quality Chocolate Matters: Since the chocolate is not diluted by milk or other thickeners, its quality is the dominant flavor. Invest in good unsweetened baking chocolate.
- Plan Ahead: Because of the required chill time, this Chocolate Silk Pie Recipe should ideally be started the day before you plan to serve it.
Delicious Variations
Flavor Twists on the Chocolate Silk Pie
- Peppermint Silk Pie: Add 1/2 teaspoon of peppermint extract to the filling mixture and use crushed candy canes instead of chocolate shavings for the garnish. This makes a festive holiday treat, similar to our Peppermint Chocolate Chip Cookies.
- Espresso Silk Pie: Dissolve 1 teaspoon of instant espresso powder in the melted chocolate before incorporating it into the butter mixture. The coffee deepens the chocolate flavor beautifully.
- Nutty Crust: Replace half of the cookie crumbs with finely ground pecans or walnuts for an added textural complexity.
Dietary Alternatives
- Gluten-Free: Simply ensure you use certified gluten-free chocolate cookie crumbs or a gluten-free graham cracker substitute for the crust. The filling is naturally gluten-free.
- Vegan/Dairy-Free (Requires Major Adaptation): Achieving the “silk” texture without butter and raw eggs is challenging but possible. You would need to use a high-quality vegan butter substitute and replace the eggs with stabilizers like silken tofu or aquafaba (whipped chickpea liquid) combined with melted chocolate and cocoa powder, often resulting in a texture closer to a dense mousse rather than traditional silk pie.
Nutritional Insights and Ingredient Benefits
The Chocolate Silk Pie Recipe is undeniably a rich, indulgent dessert, but focusing on the quality of ingredients allows us to appreciate the components and enjoy the treat responsibly.
Understanding the Calorie Content
Given the heavy reliance on full-fat dairy (butter and heavy cream) and refined sugars (powdered and granulated), this pie is high in calories, typically ranging from 450 to 600 calories per slice, depending on portion size and the generosity of the whipped topping. It is classified as an energy-dense food, best enjoyed as an occasional treat.
- Fats: The high fat content (primarily from the butter and cocoa butter in the chocolate) is responsible for the rich mouthfeel and flavor delivery. Fats also provide satiety, meaning a small slice can be very satisfying.
- Carbohydrates: Carbohydrates mainly come from the sugar (both in the filling and the crust) and the flour/starch components of the cookie crumbs.
- Protein: Proteins are contributed by the eggs and dairy (cream), although the overall protein content remains relatively low for a single slice.
The Power of Quality Unsweetened Chocolate
While the pie contains sugar, using high-quality unsweetened baking chocolate provides nutritional upsides:
- Antioxidants: Cocoa solids are packed with powerful antioxidants called flavonoids. These compounds are known for their anti-inflammatory effects and their ability to help neutralize free radicals in the body.
- Minerals: Dark chocolate and cocoa are excellent sources of several essential minerals, including iron, magnesium, copper, and manganese. Magnesium, in particular, is vital for muscle function and nerve health.
- Mood Boost: Cocoa contains natural compounds like phenylethylamine (PEA), which can contribute to feelings of well-being and improved mood. This is why a bite of a decadent Chocolate Silk Pie Recipe feels so inherently satisfying!
The Role of Butter and Eggs
In this specific Chocolate Silk Pie Recipe, butter is more than just a fat source; it’s a foundational structural component that stabilizes the emulsion. Eggs, especially the yolks, provide necessary lecithin, a natural emulsifier that helps bind the fat and sugar together, contributing to the pie’s overall smoothness and richness.
When indulging in a recipe like this, the key is portion control and prioritizing high-quality ingredients to maximize both flavor and any potential nutritional benefits derived from the cocoa.
FAQs about the Chocolate Silk Pie Recipe
How do I ensure my Chocolate Silk Pie filling is truly “silky” and not grainy?
The key is temperature and time. Ensure your butter is genuinely soft (room temperature) and that you sift the powdered sugar to remove all lumps. Crucially, beat the mixture on high speed for the full 5 minutes after adding the pasteurized eggs, as this long beating time aerates and emulsifies the ingredients completely, resulting in the signature light, silky texture. If you enjoy this light texture, try our recipe for Moist Chocolate Cake.
Why must I use pasteurized eggs in this no-bake Chocolate Silk Pie Recipe?
Since this Chocolate Silk Pie Recipe is no-bake, the eggs remain raw in the filling. To mitigate the risk of salmonella and other foodborne illnesses, it is vital to use pasteurized eggs, which have been gently heat-treated to kill bacteria while remaining safe for consumption in raw applications. This is a non-negotiable food safety step.
Can I use milk chocolate or cocoa powder instead of unsweetened baking chocolate?
Unsweetened baking chocolate is essential for the depth of flavor and structure. Milk chocolate contains far more sugar and cocoa butter solids, which will dramatically change the pie’s flavor profile and may prevent the filling from setting correctly. Cocoa powder is not recommended as it lacks the necessary fat content to emulsify with the butter and eggs for the classic silk texture.
How long does Chocolate Silk Pie last in the refrigerator?
Due to the high butter content and the fact that the eggs are pasteurized, the Chocolate Silk Pie Recipe can be stored safely in the refrigerator for up to 3 to 4 days. Always keep it tightly covered, especially after slicing, to prevent the filling from drying out or absorbing refrigerator odors. It is best enjoyed within the first two days for optimal texture.
Can I freeze leftover slices of this Classic Chocolate Silk Pie Recipe?
Yes, this pie freezes surprisingly well! Wrap individual slices (without the whipped cream topping) tightly in plastic wrap, followed by a layer of foil. The pie will keep well in the freezer for up to one month. Thaw the slices overnight in the refrigerator, and then add fresh whipped cream just before serving.
What is the secret to a perfectly stable homemade whipped cream topping?
Stability in whipped cream relies entirely on temperature and aeration. Ensure your heavy whipping cream, bowl, and whisk attachment are all extremely cold before you begin. Start whipping at a lower speed and gradually increase to medium-high. Stop immediately once stiff peaks form to avoid over-beating, which turns the cream into butter.
Conclusion: Your New Favorite Chocolate Indulgence
The quest for the perfect, deeply flavorful, and texturally magnificent chocolate pie ends here. This classic Chocolate Silk Pie Recipe delivers on every promise: a crisp, dark chocolate crust, an incredibly light and aerated filling, and a fresh, cold whipped cream topping that provides the perfect contrast to the richness below. It is a dessert of simple ingredients elevated through meticulous technique, specifically that crucial 5-minute whipping period that unlocks the “silk” quality.
Remember the critical steps: ensure your crust is fully cooled, your powdered sugar is sifted, your butter is soft, your chocolate is cool, and most importantly, always use pasteurized eggs for safety in this no-bake application. By following these guidelines, you will create a pie that is not only delicious but structurally flawless.
Whether you are a seasoned baker looking for a reliable showstopper or a beginner ready to tackle a truly classic dessert, the Chocolate Silk Pie Recipe offers an unbeatable reward for your efforts. Try it for your next gathering, or simply treat yourself to a slice of pure decadence tonight. We guarantee that once you taste the homemade silk filling, you’ll never go back to store-bought versions. Now, grab that mixer, start creaming, and prepare for pure chocolate bliss! Don’t forget to leave a comment below telling us how your pie turned out!
Classic Chocolate Silk Pie (Decadent No-Bake Filling)
Ingredients
Equipment
Method
- Preheat the oven to 350°F (175°C).
- In a medium mixing bowl, combine the cookie crumbs and the 1/4 cup of granulated sugar. Pour the melted butter over the crumb mixture and stir until everything is evenly moistened and resembles wet sand.
- Press the mixture firmly and evenly into the bottom and up the sides of a 9-inch deep-dish pie plate. Use the bottom of a measuring cup to help compact the crust.
- Bake the crust for 8 to 10 minutes until set. Remove from the oven and allow the crust to cool completely on a wire rack before proceeding.
- In the bowl of a stand mixer fitted with the paddle attachment, cream the softened 1 cup of butter on medium speed until smooth, about 1 minute.
- Gradually add the 1 1/2 cups of sifted powdered sugar to the butter and beat on medium-high speed until the mixture is light, fluffy, and very pale in color, scraping down the sides of the bowl often. This process should take approximately 4 to 5 minutes.
- Add the melted and cooled chocolate and the vanilla extract to the creamed mixture. Beat on low speed until just combined, then increase to medium speed and beat for 1 minute.
- Ensure the mixture is fully incorporated, then stop the mixer and scrape down the sides. Add the eggs one at a time, beating well after each addition.
- Once all four eggs have been added, increase the mixer speed to high and beat the filling vigorously for a full 5 minutes. This long beating time is crucial for achieving the light, airy, and 'silky' texture. The mixture will lighten in color and volume significantly.
- Carefully spoon the prepared chocolate silk filling into the cooled pie crust. Use a rubber spatula or the back of a spoon to smooth the top of the filling.
- Cover the pie loosely with plastic wrap or foil (avoid touching the filling surface). Refrigerate the pie for a minimum of 6 hours, or preferably overnight, until the filling is firm and fully set.
- Just before serving, place the cold heavy whipping cream, 1/4 cup powdered sugar, and 1/2 teaspoon vanilla extract in the bowl of a stand mixer fitted with the whisk attachment.
- Beat on medium-high speed until stiff peaks form. Be careful not to over-beat, which can turn the cream into butter.
- Spread or pipe the freshly whipped cream generously over the chilled chocolate silk pie. Garnish with chocolate shavings, if desired.
- Slice and serve immediately. Store leftovers tightly covered in the refrigerator.